The Cebro hive is a multi-body design, convenient to operate and easy to work with. Vladimir Petrovich, as a beekeeper-researcher and developer of the most progressive technology for keeping bees, paid special attention to housing for his pets.
The beehive was tested in apiaries in Russia and Belarus, owned by the students and follower of this famous theorist and practitioner. The design has been successfully used for 20 years. And the reviews about her in the professional environment are the most positive.
The content of the article
- 1 Advantages
- 2 Equipment
- 3 Assembly features and dimensions
- 3.1 Assembling the 14-frame socket housing
- 3.2 Features of inter-wall insulation
- 3.3 Assembly of shops for 10 cell frames
- 3.4 6-frame extra beehives
- 4 Blueprints
- 5 important points
Advantages
If we sum up all the positive impressions about the hive proposed by Cebro, we can highlight the following advantages of this design:
- the living conditions and activities of bee colonies are improved;
- the beekeeper’s life is made easier – it is easier and more convenient to take care of the nests;
- with a double-walled structure, the hive does not require any additional insulation inside the walls – the bees successfully winter on the street;
- store sections can be placed inside a stationary hive by opening a special side door – this manipulation is simple and convenient in execution;
- the lid of the house is securely fixed with hinges, if desired, it can be equipped with a lock;
- a special hatch in the lower part of the hive, supplemented by a retractable pallet, greatly facilitates cleaning the house in the spring (you can easily remove the underwater, rinse or thoroughly clean the pallet, and then return it to its place);
- a removable veranda is installed on the upper entrance, equipped with a glass to protect the hive from the wind.
The hive showed itself perfectly both during wintering and during periods of summer heat. During the tests, the temperature was recorded from +40 to -30 degrees.
Equipment
One complete house consists of:
- from a stationary double-walled structure containing 14 honeycomb frames – there is a bee’s nest;
- from 2 store extensions designed for ten half-frames with dimensions of 435 x 150 millimeters;
- from two bottoms intended for installation under the store extensions;
- of two covers, also designed for shop 10-frame hive sections;
- from 2 store extensions, accommodating 5 honeycomb frames;
- from boards for the arrival of bees;
- from hive supports;
- from the arrival veranda with protective glass;
- from a tray-tablet designed for collecting dead bees in the spring;
- from a warming pillow;
- from a set of plug-in boards designed for 3 bee colonies;
- from dividing grids;
- from canvas;
- from a set of Dadanov frames and half-frames (sizes 435 by 300 and 435 by 150).
Store extensions for 5 cell frames are installed as needed! They are placed on the side of the shops for 10 frames.
For layering, 10-frame extensions are used, complete with bottoms and covers (according to the principle of classic multi-body structures for three sections).
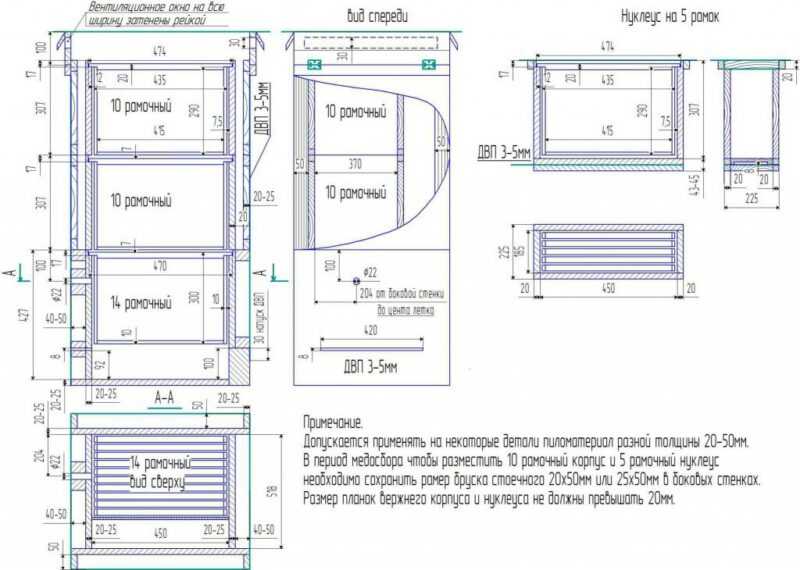
Assembly features and dimensions
The main body – it is called stationary or nested, has a double-walled structure. From the inside, the walls are assembled from plywood or sheet piling. The thickness of the inter-wall space is 4 cm – this is quite enough for reliable thermal insulation both in heat and cold up to -30 degrees.
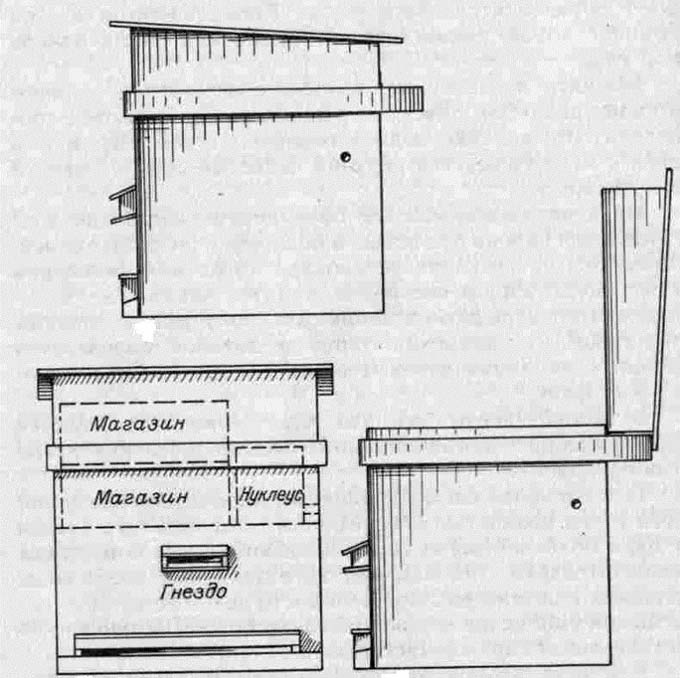
The volume of such a hive, together with two installed store extensions, is equal to 4 floors of a multi-body structure.
Assembling the 14-frame socket housing
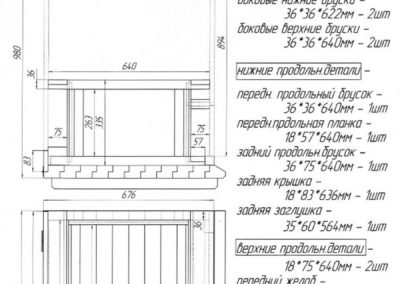
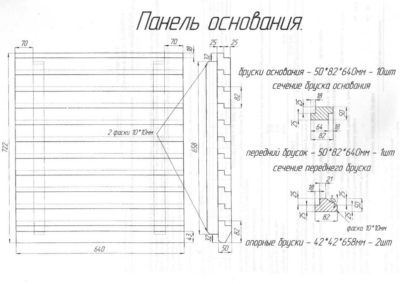
The socket is made from a sheet pile board 25 mm thick. The bottom of a 40 mm board is nailed to it. All this is lowered into a stationary plywood casing.
The lower entrance slit is cut along the width of the front wall. It is located at the bottom level and has a height of 1 centimeter. The upper entrance gap is equal in height to the lower one. Its width is 100 mm, the location is 250 mm from the bottom level in the center of the wall.
The inspection hatch is located at the rear of the house. Here, at the very bottom, a window with a height of 3 centimeters is cut through the entire width. Accordingly, a three-centimeter subframe space is formed with a body height of 33 cm. An anti-mite mesh is placed here in the summer, and a tray-plate is installed in the winter to collect podmor.
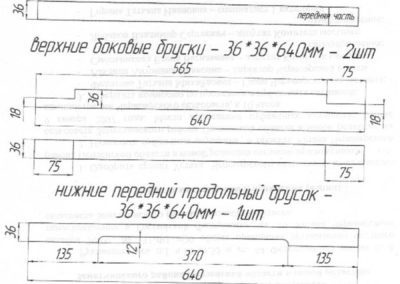
The nest section at the corners and perimeter of the bottom is trimmed with blocks with a section of 40 by 40 mm. 6 mm plywood is mounted on the frame. In the plywood casing, tap holes and a pallet window are cut in the appropriate places. The upper cuts of the outer frame are 2,2 cm above the female body.
Outside, with an indent from the upper cut of the walls of 2 cm, strips having 60 mm width and 15 thickness are nailed. They serve as a support for the roof. The side strips should protrude 120 mm back to provide support for the cover flap in the tilted position (when inspecting the hive).
The lid is made single-pitched. The harness for it is assembled from 20 mm boards (front and rear parts) and 10 mm plywood (sides). The slope is provided due to the difference in the height of the parts: in front of 150 mm, and the rear part is 120 mm Long ventilation slots with a height of 25 mm are cut in the sidewalls, which are taken away with a metal mesh.
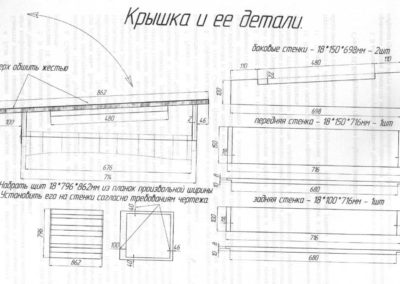
The roof plate is cut from 6 mm plywood, taking into account a 50 mm overlap around the entire perimeter. The cover is attached to the back wall of the house’s supporting structure using door hinges. From above it is upholstered with tin.
Features of inter-wall insulation
The provision of insulation and high-quality ventilation is achieved as follows:
Inserts made of slats are inserted into the space between the walls, having a height of 20 mm and a thickness of 40 mm. A warming pillow made of burlap and stuffed with tow is placed on top of the nest. At the same time, no additional thermal insulation is required – the space between the walls is not filled with insulation.
With the onset of spring, the liners are rotated – placed on the edge. The heated air rises freely under the cover and goes out through the ventilation.
For the winter, it is necessary to cover the window in the rear wall for installing the pallet. For this, a block is attached above the hatch. Here a board with a sleeve is nailed on the hinges, which closes the hole.
The veranda is installed on the lower landing board and attached to the taphole. For the winter period, a valve is inserted into it, which protects against winds and the penetration of pests. And in the spring-summer period there is a pollen trap.
The upper veranda is mounted as a single unit with a folding landing board – for the winter the whole structure rises on hinges, covering the entrance to the hive.
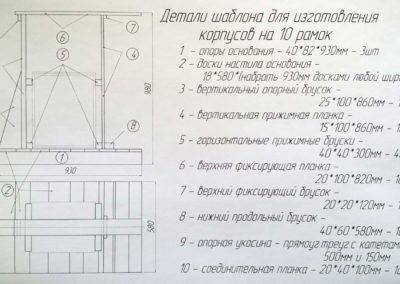
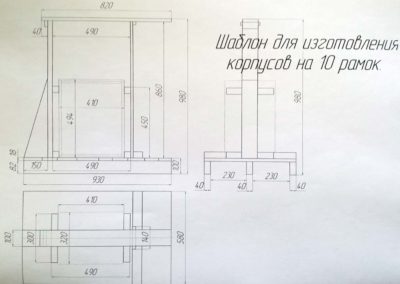
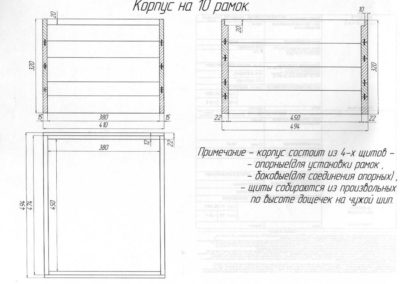
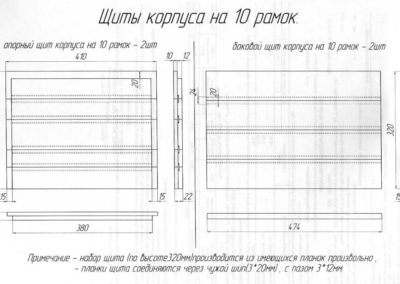
Assembly of shops for 10 cell frames
There is 32 centimeters of free space between the roof and the nest. Two store extensions are installed here, designed for a semi-frame with a height of 145 mm.
Internal dimensions of magazines (in mm):
- 450 width;
- 380 lengths;
- 155 heights.
The front and rear part of the extension is assembled from 20mm boards, and the sides are assembled from 10mm plywood.
The package includes a separating grill and two 4 mm diaphragms, sealed around the perimeter with rubber strips.
Nuclei are installed on the side – next to the store extensions. If they are not there, the magazines should be in a slightly shifted position – four nesting honeycomb frames should be visible, which allows you to easily install a building frame (it is used to destroy Varroa mites).
6-frame extra beehives
Small beehives for 6 honeycomb frames are made for the summer maintenance of helper families. They are hung with hooks on the main houses – on the left and right side walls. Also 6-frame structures are suitable for storing combs in winter.
Such beehives are collected as follows:
- The inside of the nest is cut out of 4mm plywood. Side dimensions – 47,2 by 33,5; front wall – 23,5 to 30,3; back wall – 23,5 to 32,5; bottom – 23,5 by 46 centimeters.
- Along the perimeter, a frame in the form of strips 25 mm wide and 8 mm thick is attached to all of the above blanks.
- The nest is assembled in such a way that an 8 mm gap is formed between the bottom and the front part of the body. In this case, the front and rear planes of the structure are lowered one centimeter below the sides – a shelf is formed for hanging honeycomb frames.
- Next, proceed to the sheathing. For the outer walls, you can use boards or fiberboard. The dimensions are as follows (in cm): sidewalls – 47,2 by 25,9; back wall – 42,5 by 26,7; the front wall – 37,9 by 26,7; bottom – 47,2 to 25,9.
- The overframe space is formed due to the protrusion of the upper cuts of the outer walls – a gap of 8,4 centimeters is formed here. You can install a drinking bowl or a feeder in it, as well as spread a warming pillow.
- Bars are packed on the outer walls at the top along the entire perimeter. The distance from the upper cut is 35 mm. Section 20 by 15 mm. This is the support for the lid strapping.
- The lid itself is assembled from a sheet of fiberboard (51 by 29,6 cm) and a strapping knocked down from slats. The dimensions of the planks are 4 cm in height and 1,2 cm in thickness.
- A canvas is spread on the established frames and the ceiling is laid – a sheet of fiberboard with bars-handles stuffed on top.
- The entrance slot is equipped with a trap – it is mounted between the bottom and the lower cut of the front wall, as well as a block for the arrival of bees (its dimensions are 15 by 15 by 267 mm).
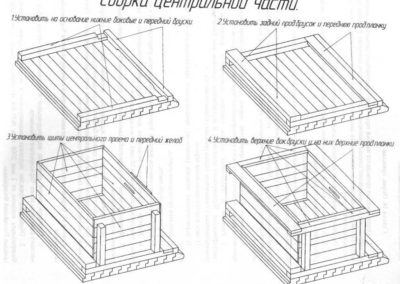
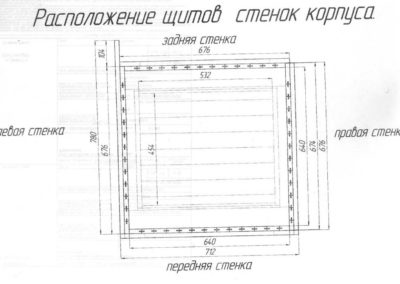
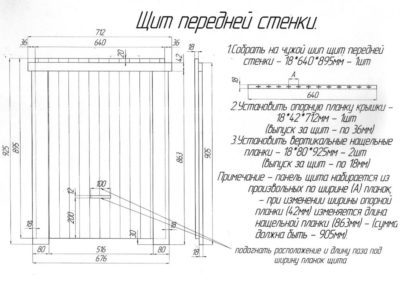
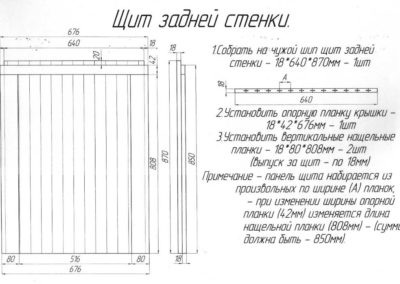
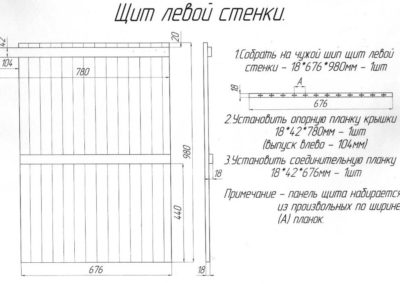
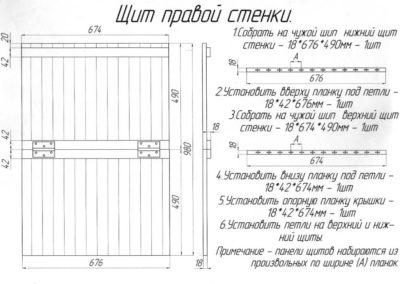
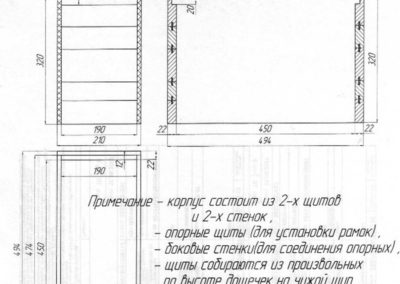
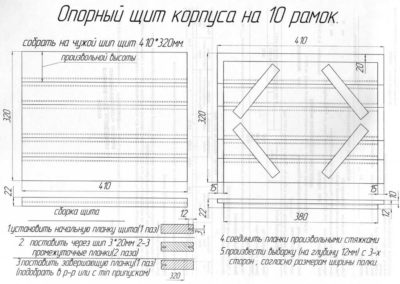
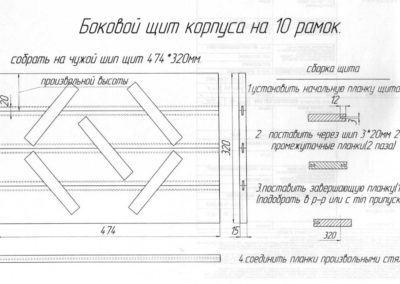
Blueprints
Beehive Cebro assembly drawing:
- the central part of the house;
- details of the central part;
- base panels;
- parts of side shields;
- the location of the shields of the walls of the case;
- front wall shield;
- back wall shield;
- left wall shield;
- right wall shield;
- covers with details.

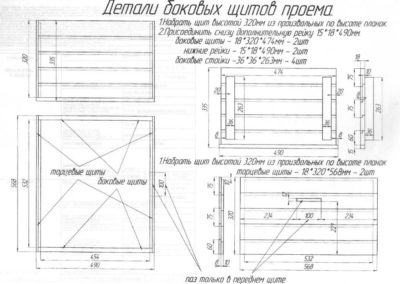
Drawings of 5-frame and 10-frame enclosure, templates:

important points
For better ventilation of the inter-wall space, it is better to knock down the outer shields of the structure in a quarter or end-to-end!
To make a Cebro hive with your own hands, it is necessary to use high-quality wood, since it is vital to provide “breathing” walls of the structure!
The material should absorb and release moisture well. Only in this case the bees will not suffer from dampness.
As is known from Woodrow’s 1935 studies, insects die in eight days at a humidity of more than 90%, and a 50% humidity reduces their life to thirty days. Moisture tends to accumulate in insect bodies. Their body is not able to cope with its withdrawal – all vital functions are inhibited.
According to Cebro, it is preferable to paint the houses with oil paint, which does not create a glossy surface. No enamel is used! The wood is preliminarily treated with linseed oil.


 of natural bee honey")


 treatment with natural honey")

