The bottom of the hive is the basis of the structure, its most important component, without which the modern maintenance of the bee colony is impossible.
Since the invention of the hive, the bottom of multi-hull systems has changed markedly, becoming collapsible and multifunctional. However, most sun loungers are still conservative classics.
The content of the article
- 1 Structural features
- 1.1 Collapsible design
- 2 Repair and maintenance
- 3 Installation
- 3.1 Drawing and dimensions
- 4 Using polycarbonate
Structural features
All hive bottoms are divided into two main types:
- nailed tightly or non-collapsible;
- removable (detachable) or collapsible.
The latter type is typical for multi-hull systems. Such bottoms are widely used in Dadans, Ruts and dozens of other hive models.
Detachable design allows you to easily change the base of the bee house in the spring, which simplifies and speeds up the entire revision process. Such a bottom does not need to be immediately cleaned and disinfected, provided that there is a sufficient supply of appropriate components in the apiary. Ideally, the bottom should have a uniform size – suitable for all hives available at the point.
Non-demountable constructions used to be used in all hive systems, including Dadans. Nowadays, such dona can be found only in sun loungers for 20-24 or more honeycomb frames.
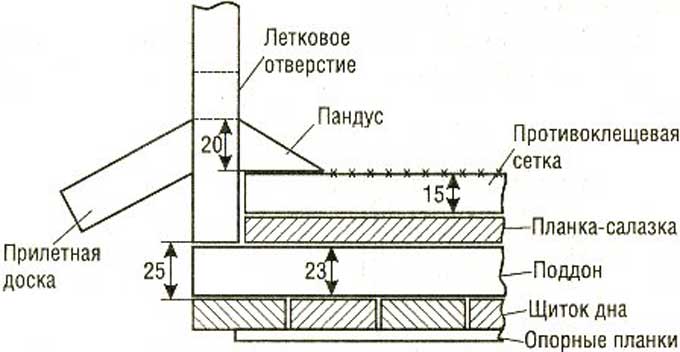
Regardless of the type of bottom used, the hive in its lower part is equipped with a board for the arrival of bees. It is attached to the bottom ledge.
Collapsible design
The detachable hive bottom is multifunctional in nature, which greatly facilitates the care of bees. The strapping here is carried out in such a way that it is possible to reduce or increase the subframe space depending on the season – to make it larger for the summer and less for the winter.
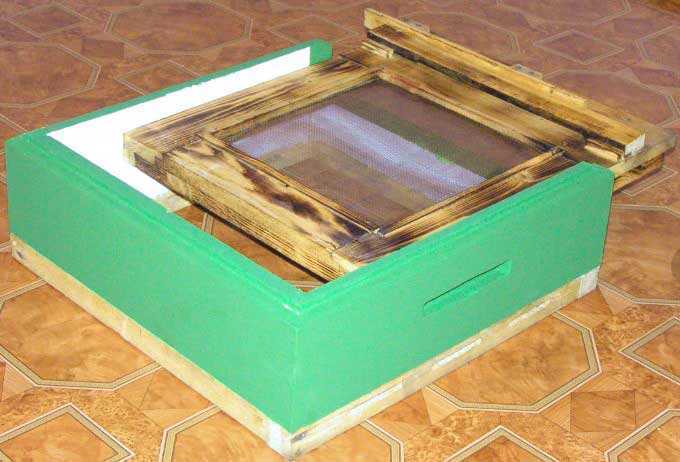
The bottom consists of three main elements:
- shield with strapping;
- pull-out pallet;
- and nets to combat ticks.
The net and the tray must be regularly cleaned of debris and fallen mites! To do this, they are taken out through a special door at the rear of the strapping or simply pushed back using the internal grooves of the structure.
After treating the hives with acaricide, thick paper or a piece of polyethylene is spread on the pallet, abundantly greased with petroleum jelly – here fallen parasites stick to the sticky layer. Later, the contaminated paper or polyethylene is burned.
Among beekeepers, mesh bottoms are becoming increasingly widespread, which are used year-round or in a set with permanent blank bottoms – for the wintering period, a mesh is installed, which in spring is replaced with an ordinary detachable bottom.
You can read more about using the grid here:
Hive bottoms with net
Some models have an inclined pallet inserted into the harness. The forward slope towards the entrance helps the bees to clean out dead and debris. However, the complexity of the design does not allow keeping a sufficient supply of these elements in the apiary – in most cases such a bottom will be constant.
Repair and maintenance
During operation, the bottoms wear out faster than the rest of the hive elements. Therefore, the apiary should have spare parts, even if the beekeeper does not change the bottom in the spring during cleaning and inspection of bee nests.
Minor defects in the form of cracks and cracks can be eliminated by cosmetic repairs. The boards of the shield are knocked down, putty and painted on both sides.
Structures assembled from thin lumber are usually insulated for spring and autumn. This technique allows you to increase the life of the product. And to protect against moisture swelling and further cracking in the heat, the hives are hoisted on a support, for example, stakes made of hard wood.
Installation
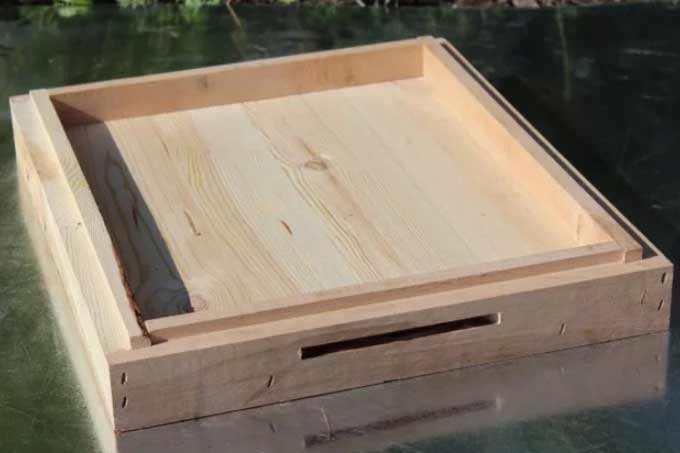
Do-it-yourself hive hollows are assembled according to the dimensions of the used bee housing – their internal dimensions correspond to the hives.
They are mounted from standard boards. The thickness of the lumber can be less than the walls of the body. The strapping is made from a bar.
In its front part, a notch is being built:
- the entire front wall of the harness is missing;
- or in the front wall with a circular saw, rip cuts of the appropriate length are made, and then with a drill, a tap hole of the required size is drilled.
An arrival board is attached to the front side of the flap. The outer corners of the strapping are fixed with metal corners for secure fastening.
You can make the bottom for the hive as follows:
1) Strapping blanks are made from suitable lumber. Their size is determined taking into account the subframe space, the thickness of the flap, sides and a stock for planing of 2-3 mm.
2.On a circular saw, bars are made, from which parts of the required length are cut.
3. A selection is made for the plates of the shield, as well as folds for installing the part in the hive.
4.Cuts are made in the front and rear parts on the circular saw for joining the corners of the harness.
5. In front, longitudinal slots are made for the tap hole. Excess wood is removed with a 12 mm feather drill.
6. Drill guide holes for self-tapping screws. The joints are lubricated with PVA. The strapping is fixed with clamps. Right angles are checked. Then the screws are screwed in.
7. Next, a shield is mounted from boards with a thickness of 25-30 mm. The assembly is carried out in a quarter or in a tongue and groove (cuts-grooves are made with special knives and a hinged drum).
8. Prepared slats are mounted in ready-made grooves on PVA glue. Boards are collected in a shield and clamped with a clamp.
9.The clamp can be removed after three hours. The guard on both sides is processed with a grinder or grinder with a corresponding attachment.
10. The finished flap is adjusted to the dimensions of the strapping on the machine. Then the part is inserted into the frame of the bars and fixed with self-tapping screws.
Important! There should be a small gap of 2-3 mm between the flap and the harness, which allows you to avoid breaking the frame of the bars when the bottom boards get wet in winter or in inclement weather. Below you can leave the sides in 4-5 mm.
Drawing and dimensions
Drawings are made according to the dimensions of the hive model used in the apiary. No specific recommendations can be made here.
Here are examples of the bottom of the hive and the drawing to it, allowing you to understand the principle of assembly:
1.Multi-body system – typical project 808-5-1:
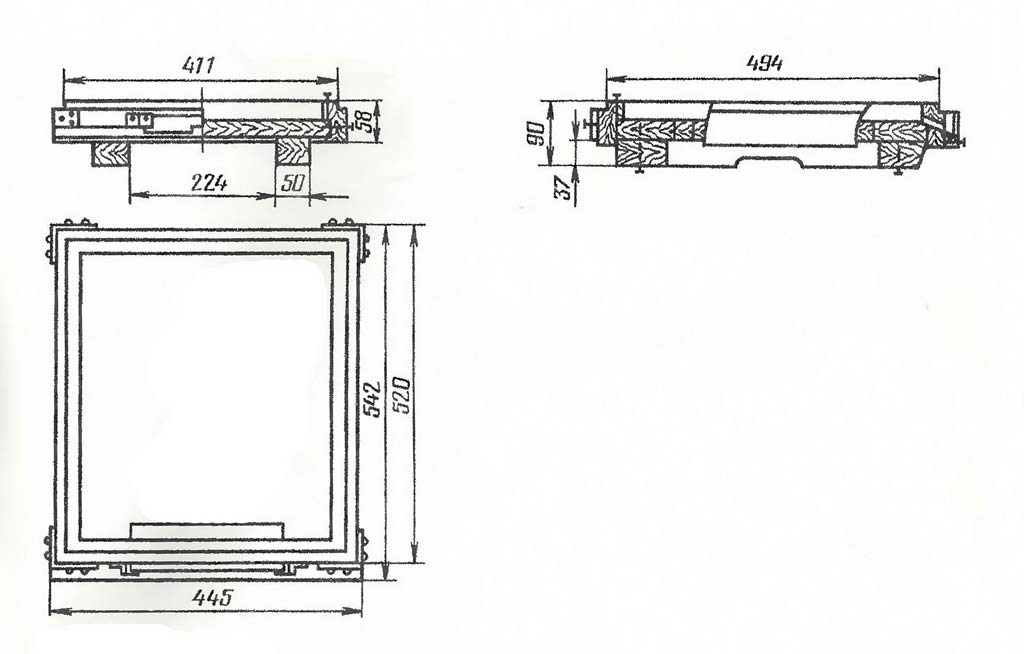
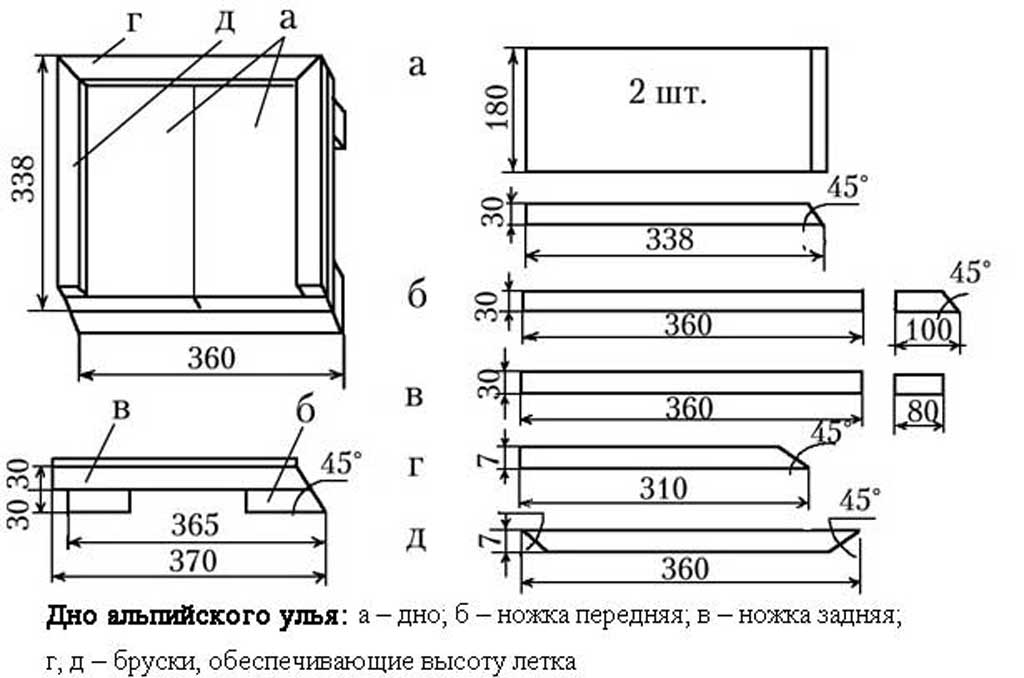
2.Alpine hive:
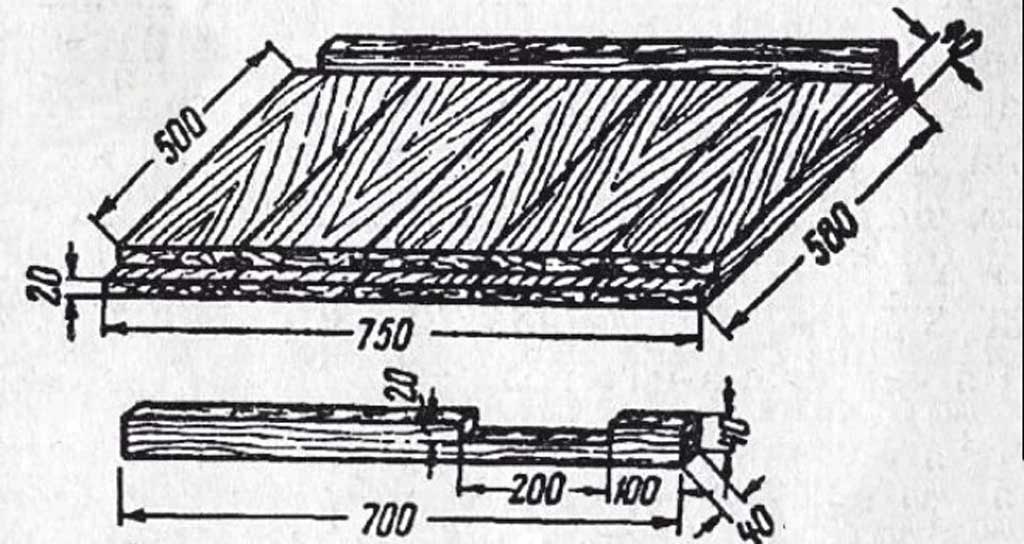
3. Bed:
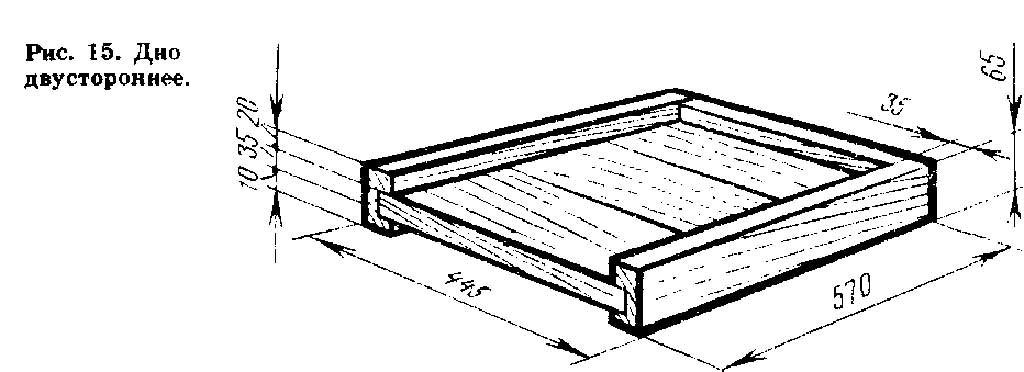
4.Double-sided bottom:
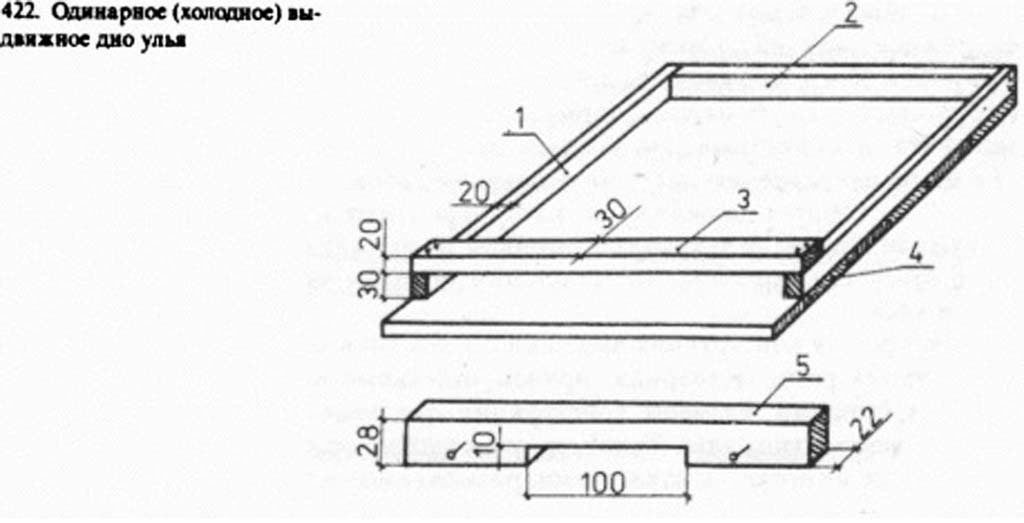
5.Pull-out single bottom:
On the back wall of the harness, you can make a ventilation slot, taken away with a fine-mesh metal mesh. It is opened for the summer.
Using polycarbonate
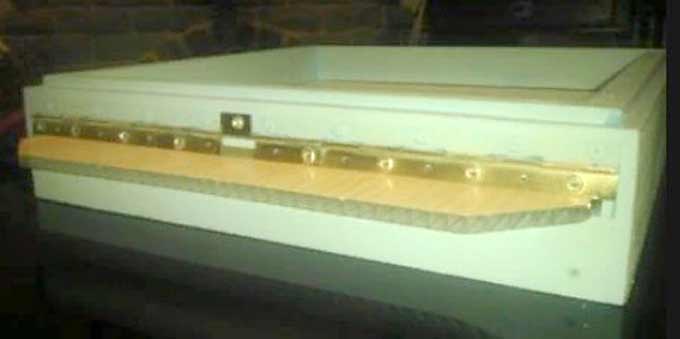
The original design with a polycarbonate insert is suitable for Dadant-Blatt systems. The arrival board is retractable here, it is also a pallet.
The entrance slot with a height of 0,8 mm occupies the entire width of the hive – 500 mm, and is located above the retractable arrival board. The so-called piano loop acts as a barricade, on one side of which it is necessary to make cuts with a hacksaw for metal – you get four independent entrances for bees.
Propyl locations:
- in the center of the loop – 30 mm long;
- to the right of the center – 60 mm long;
- one more on the right – 22 mm;
- to the left of the center – 19 mm.
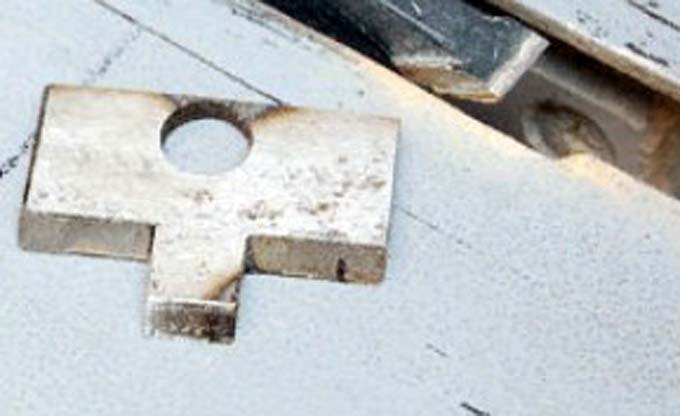
On the main trickle, the tap hole opens to its full width. The rest of the time is covered with a latch at the discretion of the beekeeper.
Here is the position of the valve in the fall:
Dimensions of strapping parts with a bar thickness of 37 mm:
- 520 by 120 – two pieces;
- 500 to 120 – one piece;
- 500 by 120 – one piece (the part is sawn into two parts, from one of which 18 mm are cut off for the landing board and the entrance).
Workpiece drawings:
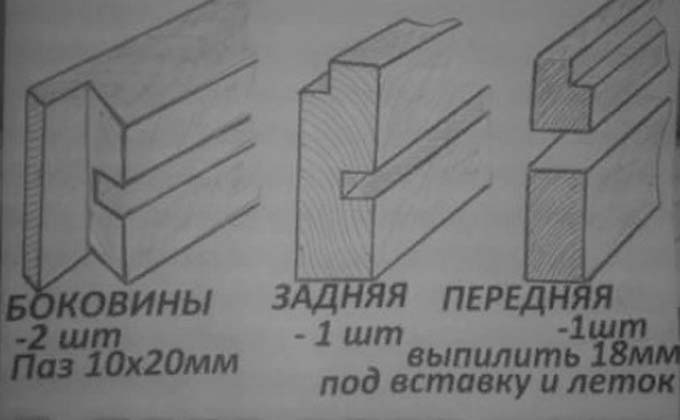
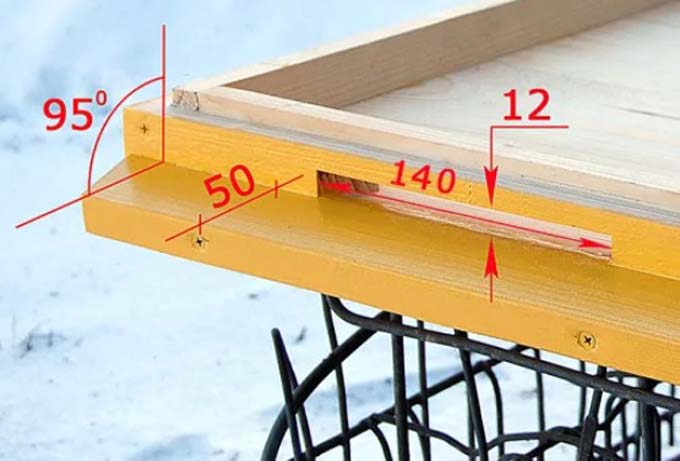
The groove for the insert is made on the machine or with a hand mill – its height is 12, depth is 20, the distance from the upper cut of the bars is 50 mm.
Dimensions of the polycarbonate insert 490 by 570 millimeters. To prevent bees from sticking wet in the rains to this material, the hives are installed with a slight forward slope for water to drain.
Advantages:
- On average, it takes 3-5 minutes to process the bottoms in the spring. The insert is pushed forward, debris, wax crumbs, debris are swept away from it, the surface is wiped off with a dry cloth.
- In summer, bees do not waste energy on additional ventilation – the entrance is wide enough and convenient for active honey collection.
- In autumn, after processing with a smoke gun, the fallen mites are swept from the polycarbonate with a brush and burned. The cleaning procedure takes no more than 3 minutes per hive.
Alternatively, you can equip a stationary arrival board in the front, and remove the polycarbonate insert from the back. This pallet option will be familiar to most beekeepers. In addition, there is no need to set up hives with a forward tilt.


")


