Beehive lounger Lazutin on a high frame was developed in the Kaluga region. Fedor Lazutin belongs to the category of beekeepers who advocate the natural maintenance of bees. This technology implies minimal intervention in the life of the hive. It is popular among beekeepers who, for various reasons, cannot often visit or live in their apiary.
The content of the article
- 1 design Features
- 1.1 Disadvantages
- 1.2 Equipment
- 2 Assembly technology
- 2.1 Using boards
- 2.2 The main stages of assembly
- 2.3 Insulation installation
- 2.4 Roof and roof liner
- 2.5 Basement mesh and bottom
- 2.6 Partition
- 2.7 Sidewalls
- 2.8 Back panel
- 2.9 Front Panel
- 2.10 Structural solution for frames
- 3 In conclusion
design Features
In general, the idea of keeping honey bees in so-called ecological apiaries is not new. Many beekeepers have turned to her. The same can be said about the hive proposed by Fedor Lazutin.
This is a fairly well-known design of a sunbed, but it can hold 25 honeycomb frames (one less than in a regular sunbed).
The framework used deserves special attention. This is a combined or “long Russian” design with a standard width. But the height of the frame is close to the Ukrainian bee-lounger, equipped with narrow-high honeycomb frames by 435 millimeters. But in bee houses from Lazutin, the height will be slightly higher – 460 millimeters, which, in general, is also insignificant.
Disadvantages
The main disadvantage of such a framework can be considered technical problems when pumping honey. The honeycomb does not fit in a standard honey extractor.
Other notable cons are:
- difficulties in maintaining the required temperature in the nests in the spring;
- complicated inspections – it is especially difficult to clean the bottom when you have to remove the frames;
- poor construction of honeycombs along the lower part of honeycomb frames, which is uncharacteristic for bees even when kept on honeycomb frames with a standard 435 by 300 millimeters;
- moldy honeycomb in winter;
- the need to use thicker strips for the frames, which ensures reliable fastening of the honeycomb (this drawback is the most insignificant, but still requires attention from the beekeeper).
Equipment
The sunbed is equipped with a large subframe space (basement). For the summer, it can be separated from the main space of the house with a mesh.
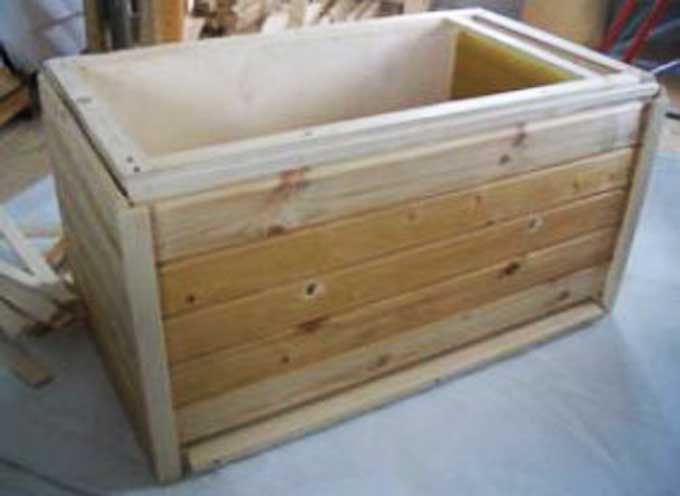
For ease of transportation, the entire structure is easily disassembled into components:
- two sidewalls;
- front and back wall;
- rear removable panel for easy access to the subframe space;
- bottom;
- roof liner;
- gable roof;
- decorative elements of the roof (gables, wind, corner boards).
Any roofing material is used to protect the cover from moisture. The kit necessarily includes a mesh bottom, with the help of which the “basement” is divided in the summer. And also the diaphragm (partition wall).
In a vertical section, the house looks like this:
And this is a horizontal section:
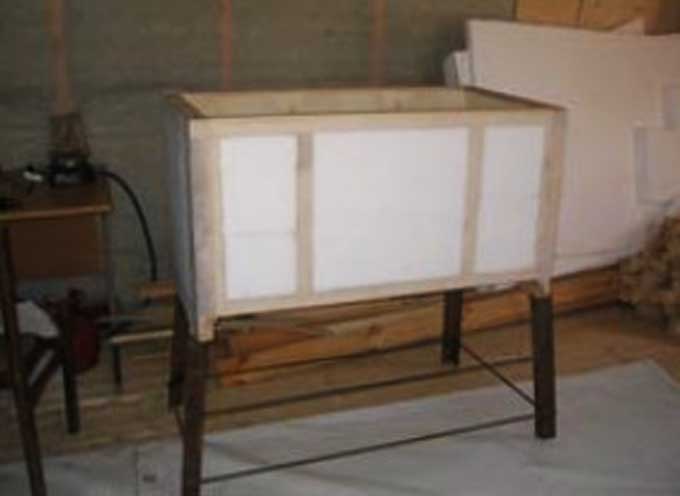
Assembly technology
The structure is assembled using frame technology – a heater is placed between the two walls.
It looks like this:
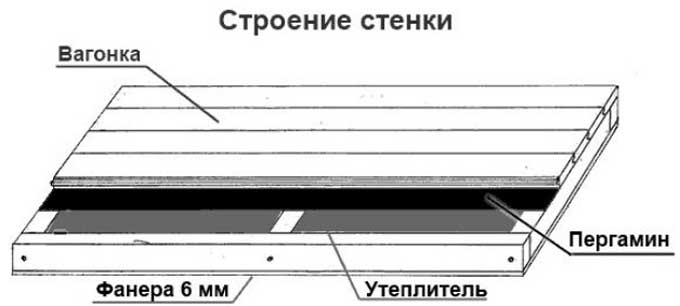
Plywood with a thickness of 6 mm is stuffed onto a frame made of bars. From above it is sheathed with insulation. The insulating layer is protected from environmental influences using lining.
Ready-made insulated hives are suitable for wintering honey bees outside. They are warm and dry enough.
Using boards
Other materials can be used. For example, boards. The main thing is to preserve the layout of the bee house and its dimensions inside.
If wood is taken for work, the boards should be thick enough – from 50 to 80 millimeters. The thicker, the better, since the wood cracks during use.
The ideal option is to place it on the outside on the boards to insulate, and then sheathe it with protective material. This will save the hive from temperature extremes and the destructive effects of condensation.
With the classic frame technology, you can choose a small thickness of the boards – 20 to 25 millimeters:
- the inner box is knocked out of them;
- a frame made of bars is made outside – the space between the outer and inner walls is 50 mm;
- the outer sheathing is made of grooved boards (20-25 mm);
- the space between the walls is filled with loose insulation, for example, dry wood shavings, moss.
The main disadvantage of wood is the high cost of the final product. You will not find such hives in stores, as manufacturers are trying to save money. Therefore, wood is used exclusively in home workshops. High-quality and durable bee houses are obtained from it.
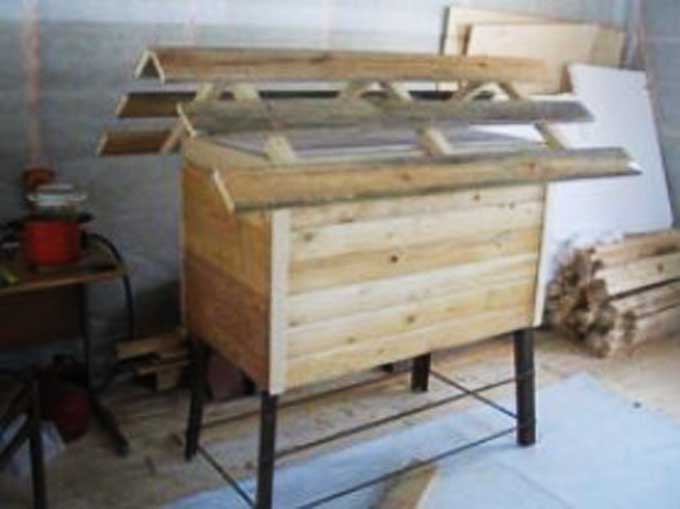
The main stages of assembly
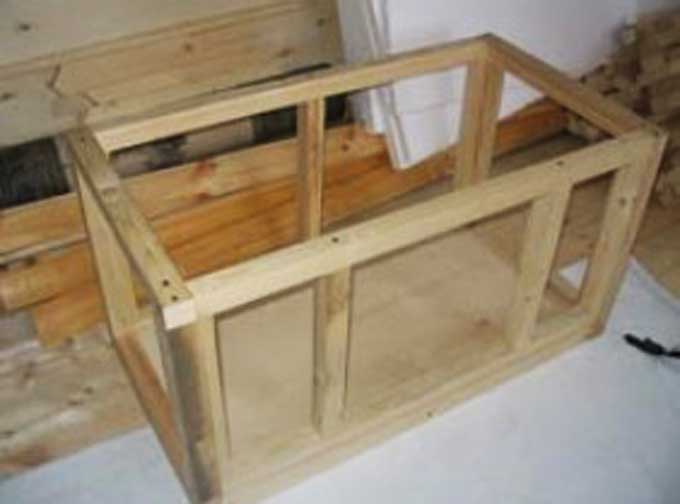
No matter what materials the house is assembled from, all work is carried out sequentially:
- First, the walls are mounted using self-tapping screws (120 mm). Previously, holes can be made in the corners with a drill, which will facilitate the entry of self-tapping screws. To seal the joints, polyethylene foam with a thickness of two to three millimeters is used.
- The bottom is nailed to the frame with nails (60-70 mm).
- Then the removable back panel is inserted. It is fastened at the discretion of the master with any fixing elements.
- The roof slopes are mounted to the assembled roof liner with self-tapping screws. Roofing material, decorative elements (pediments, and so on) are installed.
- At the final stage, the lid is installed on the house with the help of two door hinges, which provide free folding of this element when examining the bee dwelling.
Insulation installation
In order for the frame technology to give the expected results, the walls must be assembled correctly.
The sequence of work on assembling and insulating the frame is as follows:
- With the help of self-tapping screws 100-110 mm long, the frame is assembled from the bars end-to-end. Folds are selected in advance! The thickness of the insulating layer will depend on the size of the bars used. The recommended section is 50 mm, but the size can be any size at the request of the owner.
- Six-millimeter plywood is nailed to the bars from the inside.
- Insulation can be either natural (sawdust, moss) or artificial – for example, made of polystyrene (expanded polystyrene).
- From above, the insulating layer is protected by a vapor barrier material that passes through the air. Glassine is best suited for this purpose.
- The outer cladding is made of lining 16-19 millimeters thick. Thinner specimens of this building material are not suitable for hives!
Roof and roof liner
The roof can be covered with any material. The cheapest option is roofing felt laid on the slopes in two layers.
A cover is assembled from rafters with a length of 60 and a section of 40 by 45 millimeters (three for each roof slope). Planks 137 mm long are stuffed on them. The thickness of the lathing is no more than 25 mm!
Decorative elements are required, but can be of arbitrary sizes. These are four wind and corner planks, two pediments.
The roof cover is assembled according to the following scheme:
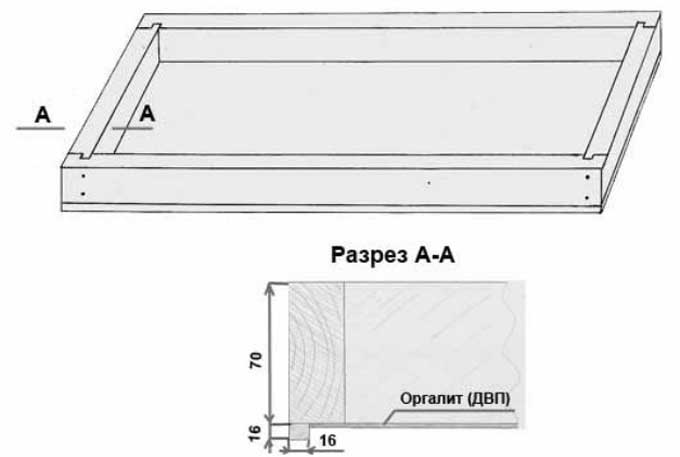
Its dimensions are 600 x 1 mm. The frame is mounted in a tenon and a groove as shown in the picture above. The bars can be of any size. The drawing shows a cross-section of 090 by 45. The folds on the outside along the bottom of the frame are made using blocks of 70 by 1,6 cm. A fiberboard sheet is inserted into them and fastened with studs. Insulation (up to 1,6 cm thick), for example, polystyrene, is laid on the fiberboard. From above it is covered with a vapor barrier material.
Basement mesh and bottom
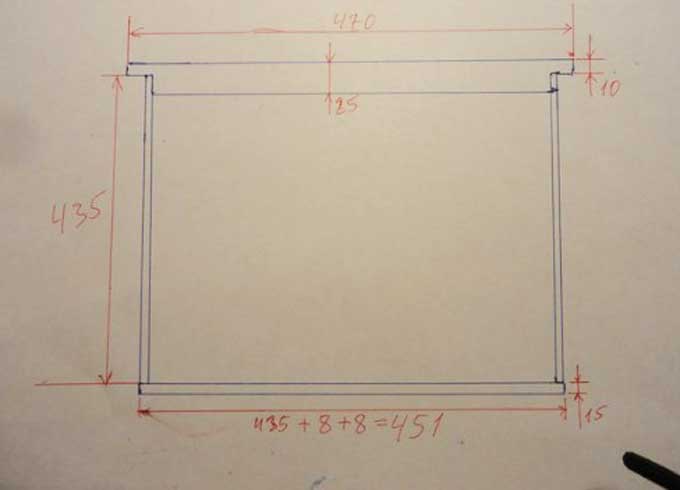
The mesh for the “basement” has a frame 2 cm thick with dimensions of 445 by 935 millimeters. Bottom dimensions: 490 by 980. It is assembled from grooved boards. Recommended thickness is from 20 to 25 mm.
The main thing is to respect the size of the grid. It should freely enter the “basement” space and be placed in a horizontal position using any fixing elements.
Partition
The dividing wall (diaphragm) is made from a single piece of plywood or boards. The distance from the net at the bottom is 1-2 centimeters. The bees must move freely between the frames!
The diaphragm adheres to the walls as tightly as possible. To do this, it is sheathed around the perimeter with a sealing tape made of polyethylene foam.
It is allowed to use, instead of a full-fledged diaphragm, a piece of polystyrene, cut to size and having a thickness of 5 cm. From above, the sheet is packed in polyethylene. Such a divider is short-lived, but easy to manufacture.
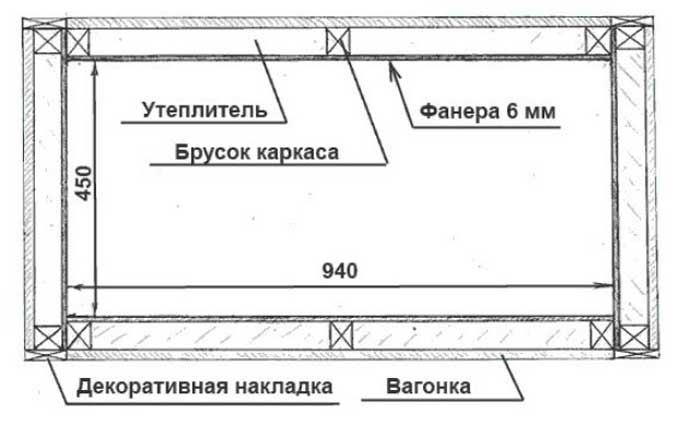
Sidewalls
If climatic conditions permit, only the side walls can be insulated.
Their dimensions are 562 by 630 mm. Finished thickness 75 mm (if a 50 mm insulation is used):
- 6 mm – plywood of the inner wall;
- 50 mm – insulation;
- 19 mm cladding paneling.
The folds are selected inside along the lower part of the walls and do not reach the ends by 36 mm. Their dimensions in finished form are 20 by 25 mm.
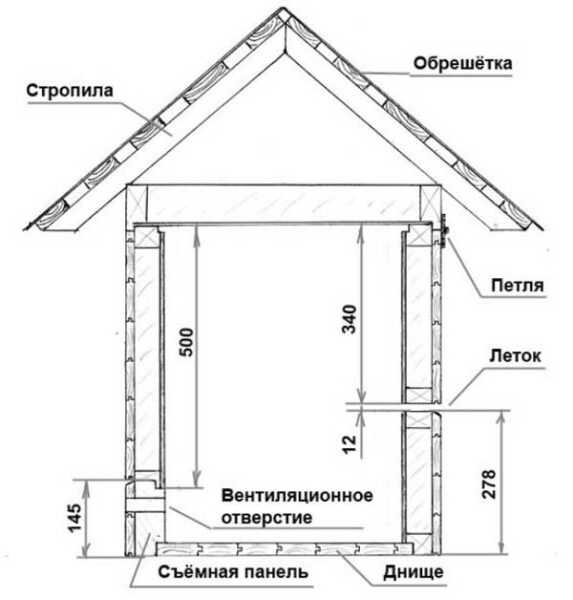
Back panel
The back wall has two folds (in mm):
- outside from the bottom – 15 by 37 (for installing a detachable panel);
- inside at the top – 11 by 11 (to accommodate honeycomb frames).
Wall dimensions – 940 by 500.
Rear detachable panel dimensions – 940 x 145. Panel folds (in mm):
- inside at the bottom – 20 by 25 (for installing the bottom);
- inside at the top – 15 by 37 (for docking with the main rear wall).
There are four ventilation holes in the detachable panel. They are located along a line drawn at the middle of the height at 4 and 26 cm from the edges. Diameter 2,5 cm (25 mm). To avoid rainwater infiltration, the holes are drilled with a slight outward slope.
Front Panel
The dimensions of the front wall are 940 by 630. The upper entrance slits are made 34 centimeters from the upper cut. Their width is 1,2 cm (12 mm). The lower entrance slot is formed between the lower cut of the front panel and the bottom.
Folds (in mm):
- inside at the bottom – 20 by 25 (for installing the bottom);
- inside at the top – 11 by 11 (for installing honeycomb frames).
Structural solution for frames
In the variant proposed by Lazutin, honeycomb frames are made on the basis of Dadanov frames.
In the given basic drawing, the height needs to be changed to the recommended 460 mm. A bar is attached at the bottom, not a bar! This allows the wire to be pulled vertically.
The main difficulty in working with such dimensions arises during the period of honey collection. Honeycombs do not fit in a standard size honey extractor.
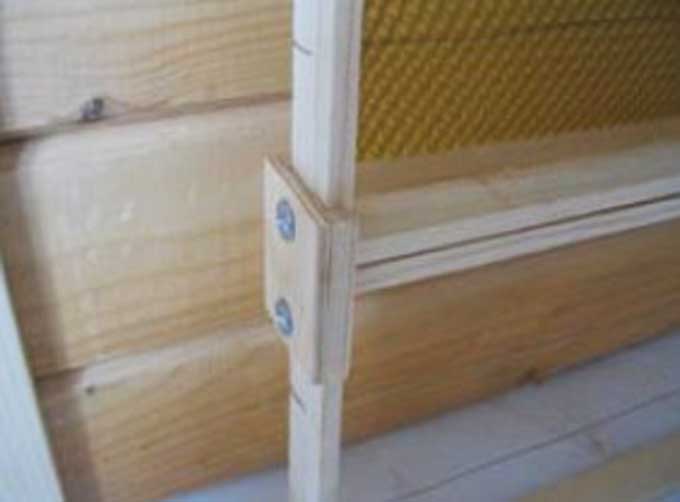
Therefore, another design solution is proposed, which significantly simplifies the life of the beekeeper. High frames in this version are assembled from standard Dadan and store semi-frames:
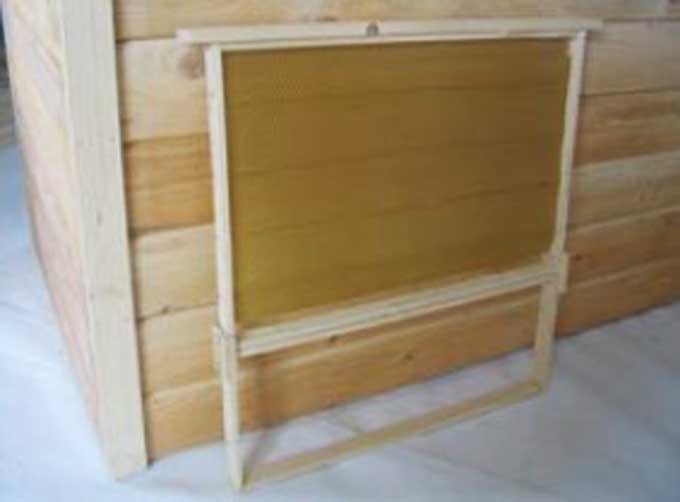
With the help of the mount shown in the photo, you can disassemble the high frame into its constituent elements for pumping honey in a conventional honey extractor.
In conclusion
As always, we recommend that you treat bees wisely. Bee hives with a high frame and Lazutin technology of keeping are not a panacea and not guaranteed protection against errors.
The position of complete non-interference in the life of the bee family is good and attractive for moral and ethical reasons, but in practice it is not always acceptable.
For example, it is impossible to blindly follow Fedor’s recommendation and take honey only in the fall. There are regions in which the bribe is so abundant that it is necessary to pump it out up to five to seven times per season (up to 8 kilograms of nectar is brought in a day).
The same applies to the treatment of bee diseases exclusively with folk remedies. About 50 diseases are mentioned in the modern reference book. And even the strongest bee colonies are unable to cope with some of them. The same Varroa mite, without timely treatment and prevention, destroys most of the apiary in two to three years. Therefore, the cutting of drone brood cannot be attributed to “barbarism” – after all, the maximum number of female ticks gathers in it. This means that the taken “radical measures” are fully justified from a veterinary point of view.
The task of a beginner (no matter how corny it may sound) is to love their pets, constantly improve, analyze the information received and test it in practice. Without a balanced and thoughtful approach to business in beekeeping, nothing will come of it.


")
 - keeping bees, expanding")


