In order to get a good harvest, the planting of cauliflower for seedlings must occur at certain times. It is allowed to grow it in different periods.
- Sowing the seeds
- Care for cauliflower seedlings
- Dive <
- Hardening <
- Feeding
- Disembarkation <
- Diseases
- Prevention
- Pests
- Summary
Planting cauliflower on seedlings
Sowing seeds
Sow cauliflower for seedlings in at home, it is necessary to a depth of 5-7 cm and at a distance of 1 cm from each other. They choose mainly peat seedlings for seedlings, after which it is watered and mulched with dry sand. The temperature regime is 20–25 ° C. Before planting cauliflower on seedlings, the seeds are treated for diseases and pests.
Dates of planting cauliflower for seedlings:
- the first – from March 15 to 20;
- the second – from March 30 to April 10;
- the third – from April 25 to May 10.
To grow late-spring cauliflower seedlings, the seeds are sown from June 5 to June 15.
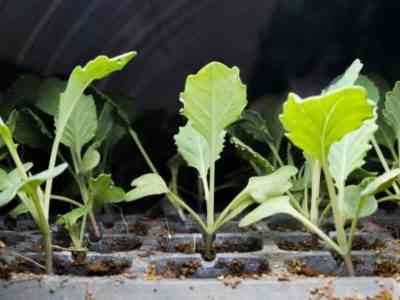
Care for cauliflower seedlings
Properly growing cauliflower seedlings at home will help to accurately observe the temperature regime and care for the crop.Seedlings begin to rise in greenhouses at a temperature of 20 ° C 4-5 days after sowing.
After they appear, a temperature difference is needed: the first time it is reduced to 7 ° C for a period of 4 to 5 days, and the second – increase to 15 ° C. Such jumps will not allow the sunrises to stretch much.
The care is divided into several stages. The process of growing seedlings from seeds on average takes about a month.
Dive
If you plan to grow early varieties, you need to dive seedlings. This process is the transplanting of seedlings from a common container into separate small containers.
At the age of 8-10 days after planting, when the first true leaves began to appear, seedlings dive. Peat boxes are ideal for this process.
A few days before this procedure, 10 g of ammonium nitrate is placed in the pots, then sawdust is added. The mixture, which is used when transplanting into separate containers, is made of the following components:
- double granular superphosphate – 12 g;
- lime – 25 g;
- ammonium nitrate – 10 g;
- potassium nitrate – 5 g;
Ammonium and potassium nitrate are previously diluted with water. By consistency, the mixture should not disintegrate in the hands, it should have sufficient density.
After the dive is completed, the soil in the pots should be moderately moistened so that the seedlings do not become sick.Picking is not a mandatory process, but it has several advantages:
- replace the old soil with fresh;
- increase the area of plant nutrition;
- remove the weak and sick seedlings;
- prevent the problem of dense crops;
- save the sown area.
You can dive seedlings in open ground, after removing weak and diseased sprouts . During the day, the planted seedlings should be covered from direct sunlight and watered abundantly for the first 3-5 days.
Hardening
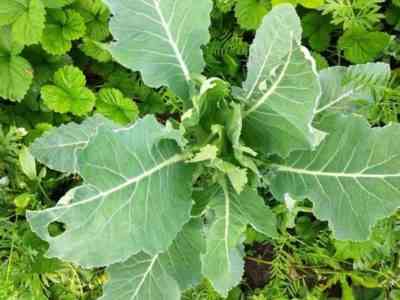
Preparing for planting
Before planting in open ground, it is better to temper the sprouts to possible cold and sunlight. 3-5 days before transplanting to the garden, seedlings are moved to a cold greenhouse. If frost is expected, it is not recommended to open it at night.
Feeding
During the growth period, the culture is fed 1-4 times. The first top dressing is introduced 8-10 days after the pick, if seedlings are not picked, then when the second true leaf appears. When feeding, the solution is used for the first time: 10 g of urea, 20 g of superphosphate, 10 g of potassium fertilizers are taken per 10 l of water.
The second feeding is carried out 7-10 days after the first. The second top dressing for 10 l of water requires 15 g of urea, 30 g of superphosphate, 20 g of potash fertilizers.
It is necessary to feed for the third time – after about 10 days, introducing the following trace elements: copper sulfate, magnesium sulfate, boric acid. After each feeding, thorough watering is required, after which the soil is loosened and hilling.
Planting
Early varieties are grown in mid-May, late varieties are grown in late June or July, since they require a larger area due to bushiness.
Cauliflower seedlings are planted in the garden with different distances between plants. It depends on the variety. Too dense landing is undesirable: the heads will turn out small. Wells for planting are done with a scoop.
To properly grow cauliflower seedlings, when planting, try not to fill the upper bud. The ground near the plant is pressed and watered abundantly. The irrigation site is sprinkled with dry soil: this prevents the formation of unnecessary crust. Cauliflower seedlings of early varieties are planted shallow in warm soil to accelerate root growth.
- Before planting, the seedlings are sprayed with water and sprinkled with tobacco dust or pyrethrum (as a prevention of this kind of flies).
- Planted in early spring seedlings are afraid of frost. Bushes planted before mid-May are wrapped in a transparent film or cover the entire bed.
In this way, crop ripening can be brought closer to 7-10 days. The coating is removed 12-15 days after planting, then short-term frost seedlings are no longer terrible.To better heat the soil, seedlings are sprinkled with ash, having previously stood it for at least six months.
In order for cauliflower seedlings to grow well, it needs additional care – protection from pests and diseases.
Diseases
The black leg, or rot of the root neck of seedlings, is a common fungal disease that affects seedlings from the moment of seed germination until 2-3 real leaves appear on the sprout. When a fungus is affected, a black constriction appears at the bottom of the plant, and the root neck begins to blacken. Only 4-6 days in high humidity lead to softening and fragility of the diseased stem, the sprouts in this case die. The main route of entry is through the ground.
Also contribute to the spread of the black leg:
- thickened seeding;
- poor ventilation;
- sudden changes temperature;
- high humidity.
Root of the root neck appears on weakened sprouts. This scourge is not treated, but the selection of high-quality seeds or varieties that are more resistant to the disease helps prevent it.
Prevention
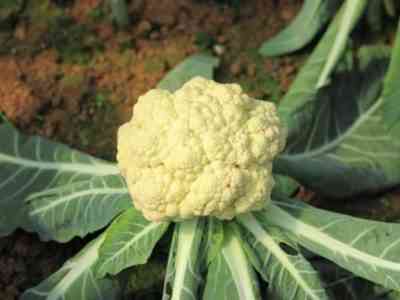
Proper care gives an excellent yield
Preventive measures for cauliflower seedlings:
- steaming the soil before sowing;
- soil disinfection for sowing with a solution of 3 g of manganese acid potassium per 10 l of water, also use the drug “Trichodermin”;
- seed treatment with fungicide before planting;
- seed treatment with drugs that stimulate the immune system of plants;
- sprinkling soil with calcined sand after planting and picking;
- temperature control after watering;
- destruction of infected plants at the first sign of illness.
Pests
Young sprouts of broccoli affect not only diseases, but also pests. Insects destroy young as well as adult plants. Among them:
- Bedbugs. These parasites, piercing the skin, draw vital juice from the plant. In case of damage by bugs on the leaves, wounds are clearly visible, which subsequently replace yellow spots. The plant fades and stops growing. If there are more than 2 bugs on a sprout, treatment should be started immediately. It is recommended to weed the beds with seedlings, and the affected plants should be treated with an insecticide.
- Fleas. These parasites make labyrinths of holes in young leaves. Infected seedlings dry out and die.For preventive purposes, weeds should be regularly removed, and on hot days covered with special non-woven material. Having found fleas, the treatment is carried out with chemicals.
- Caterpillars. You can exterminate the caterpillars using a decoction based on tomato tops (2 tbsp. Ash, laundry soap and 10 liters of water).
- Stalk secretive hunter. The larvae of this beetle gnaw holes from the stem to the roots. Without nutrients, the leaves slow down their natural growth. If a pest is found, the infected seedlings are thrown out, and the soil is dug up and the pits are leveled.
- Cabbage fly. The larvae of these flies fall into the roots, which eventually rot, the plant dies. Flies begin to be treated when the lower leaves are darkened with chemicals from dangerous pests.
Conclusion
Cauliflower seedlings are planted at home quite easily. Timely preventive measures allow you to better grow a good crop: sprouts affected by diseases and pests must be destroyed. Be sure to observe the temperature and landing conditions.


