Transplanting a Phalaenopsis orchid at home is a matter requiring some knowledge. To understand all the intricacies of the question, you should thoroughly study the algorithm of actions and perform them, follow the instructions. Then the orchid will thank you for its abundant flowering and beautiful appearance.
- Preparing for the transplant
- Reasons for transplant
- Transplanting a new orchid
- Transplanting a baby
- Pot selection
- Substrate selection
- Transplant process
- Post-transplant care tips
- Possible transplant errors
- Conclusion <
Phalaenopsis transplant
Preparing for the transplant
The substrate in which the orchid grows loses its quality over time, necessary for its full growth. It accumulates hard mineral salts, air permeability worsens and the acidity level changes. The gradual destruction of the substrate structure causes excess moisture, which further provokes a decrease in plant immunity or decay of its roots. To avoid such situations, the soil in which phalaenopsis grows is changed fresh every 3 years.
To transplant phalaenopsis, you will need:
- pruning shears or sharp scissors;
- activated carbon;
- soil;
- capacity;
- “Epin” and the preparation for pests “Fitoverm” (if necessary);
- flower stalk holder.
To ensure proper nutrition and comfortable development, the choice of a new pot and soil should be approached with full responsibility.
Reasons for transplantation
After the phalaenopsis has faded, the question arises of the appropriateness of its transplant. If he is healthy, he has strong, green roots with a silver sheen, he sits firmly in the tank, and the soil is without external changes and limescale, then it is better to wait another year or two with the transplant. When deciding to transplant a Phalaenopsis orchid, the best time for this is early spring or autumn.
Phalaenopsis is transplanted in the following cases:
- sudden wrinkling and yellowing of leaves, rotting of roots or covering them limescale;
- the quality of the substrate deteriorated due to the prolonged use of unfiltered water or a large amount of fertilizer;
- Phalaenopsis disease or damage by pests;
- the root system filled the entire capacity displacing the soil;
- the plant fell one hundred he outweighs the pot, making it unstable;
- the walls of the pot on the inside were covered with green bloom;
- suspicious lumps of compressed sphagnum or pieces of foam between the roots;
- fall the pot at which the plant fell;
- 3 years have passed since the previous transplant;
- when the baby grew up.
If an urgent transplant of a phalaenopsis orchid after purchase is required for a flowering plant, then cutting off all dried and rotted roots, cut the peduncle to the first bud so that it can more easily bear the stress from root loss and recover faster. When it falls out of the container due to a fall, it is returned to the same or larger pot.
New orchid transplantation
Phalaenopsis orchid transplantation after purchase is optional. After changing the place of residence, the flower tolerates stress, so they give it a couple of weeks of quarantine, monitor it, monitor the condition and speed of drying of the soil, and decide upon completion of acclimatization.
Substrate is replaced immediately after acquisition, only if the roots are thin and wrinkled. This appearance is caused by the fact that the transplantation and watering of phalaenopsis at home is different from those that were in the nursery. After abundant spraying with stimulants, the roots of the plant are depleted, because all efforts were directed to the growth of the peduncle and buds.
Baby transplant
It is recommended that the orchid be replanted if its root has grown 5 cm in length. This means readiness to independent existence.
Tools are required similar to those used for transplanting adult orchids, only a fraction of the soil is finer. The baby is separated from the mother plant, leaving a small area of the peduncle on which it sits. Places cut treated with activated carbon.Drainage and a little soil are poured to the bottom, then the baby is placed in the center of the pot and the substrate is evenly distributed around it. Top soil is covered with sphagnum and put in the shade for a week. Watering starts in 2-3 days.
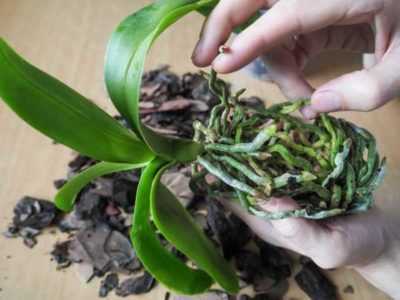
Phalaenopsis baby transplant
Pot Selection
Phalaenopsis in a transparent plastic pot should not be exposed to direct sunlight, as Due to the greenhouse effect, the roots die and a green bloom of algae forms on the walls. Also, large containers should not be selected, because after processing and pruning the roots, the plant needs a pot of a similar or smaller size.
The new container must meet the following requirements:
- must be 3 times wider than the previous one see and a little higher;
- transparent plastic is preferable to other options, because for the correct development of the roots take part in photosynthesis;
- for the intake of air in sufficient quantities, ventilation holes are required;
- pots in the form of sticks or setos A substrate with a large number of openings is not suitable for indoor conditions, because the substrate dries constantly: they are best used for decorative purposes;
- there should be a small leg for air circulation below.
If the selected flowerpot is made of ceramic, the inner part must be smooth so that the roots do not grow.A glass pot is less preferred. For a phalaenopsis-mini, a small pot or a plastic cup with holes for draining water is prepared.
Select substrate
In nature, orchids are epiphytes that grow on trees and cling to they are rooted, so the soil consisting of bark is optimal. It should be breathable, dry relatively quickly after watering and slowly decompose. The ideal option is pine bark. In some cases, a small amount of sphagnum moss is added to the soil surface to increase the moisture retention time of the latter.
Main qualities of the substrate:
- for rooms with dry air, the soil is selected more moisture-resistant;
- it should be loose and not fall into a dense mass;
- speed of complete drying – 3-5 days;
- particle size – 1.5-3 cm;
- made from the bark of freshly sawn pine.
Before use, the bark is sorted and subjected to boiling for sterilization. The substrate from a specialized store is not sterilized. The main component of this soil is also pine bark with the addition of crushed fern roots and charcoal. The main requirement for soil from the store is friability, airiness and coarse fraction.
When transplanting, part of the old substrate is mixed with the new one in order to transfer the microflora familiar to plants to the new soil.
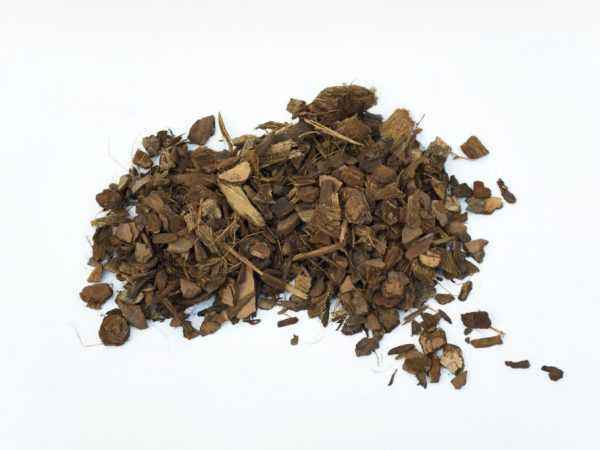
The substrate for the phalaenopsis orchid
Transplant process
A solution of phytosporin is preliminarily prepared to soak an orchid in it. For this, 1/5 tsp substances are diluted in 2 liters of water and 10 drops of epin are added to stimulate immunity.
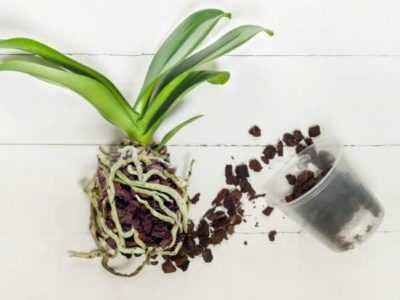
The orchid is carefully removed from the pot, holding the stem base. To lighten the pot slightly crushed. Due to the strong growth of the roots, the pot is cut with scissors. After extraction, the flower is placed in a wide basin and carefully brushed off from the old soil, except for the adhered particles. The residues are washed off with water.
Inspect the leaves, roots and trunk of the plant. All rotten, yellowed, blackened or wrinkled areas are removed, leaving healthy, green or silver. If such a problem is detected, rotten and black spots on the surface of the outlet are cleaned to healthy tissue. The leaves are removed by first cutting along and then removing the remainder from the stem.
After the inspection is complete, the roots of the plant are dipped for half an hour in a prepared phytosporin solution and dried. 3-5 cm thick drainage is laid at the bottom of the tank to protect against waterlogging, and a little soil is laid on top. Phalaenopsis is located in the center, next to set a stick that supports the peduncle. It should be made of bamboo and varnished so that the roots that touch it do not begin to rot.Gradually, the voids between the roots are filled with soil, placing large pieces of bark below, and smaller ones on top. If necessary, the substrate is covered with a thin layer of sphagnum to protect against rapid evaporation of moisture.
Care tips after transplantation
Properly transplanted healthy phalaenopsis easily tolerate this process and begin to grow roots, to gain a foothold in an updated breeding ground. The first 10 days they are kept in the shade at a temperature of 22 ° C and are not watered, but fertilized no earlier than a month later. After transplantation, phalaenopsis care consists in observing the watering regime, and after root growth is activated, in fertilizing with fertilizer intended for orchids, in accordance with the instructions on the bottle (every 2 weeks). It is considered more effective to immerse the pot with an orchid in water for 15 minutes, so that the soil absorbs moisture, rather than the top watering.
Indoor flower, which lost most of the roots during transplantation, requires step-by-step care. After transplanting into the container, the orchid, closed on top with a sphagnum, is strengthened with sticks to fix it. At first, the flower is not placed in direct sunlight. The care system includes constant monitoring of weakened plants and timely watering, they are fertilized only after phalaenopsis releases young roots.
Possible transplant errors
- wrong soil selection (too small fraction provokes root rot due to lack of sufficient air and humidity);
- a small number of drainage holes in the pot;
- cauterizing the roots with green;
- transshipment into a new pot without inspecting the roots and soil;
- too spacious a container chosen for transplantation (it provokes the growth of green mass instead of flowering, as a result, the orchid grows, not blooms);
- the habit of spraying instead of watering (this way moisture leads to hidden drying of the roots, and after excessive drying, the substrate does not absorb moisture well, due to lack of it, the roots dry out and die);
- watering by soaking for a long time immediately after transplantation.
Conclusion
The Phalaenopsis orchid is a tropical climate plant that does not tolerate excessive waterlogging. The structure of its roots allows the velam to accumulate in layers It has enough moisture and gradually uses it. She also does not like excessive spraying, direct sunlight and a large amount of fertilizer. This is less capricious plant than it seems at first glance, because after a thorough study of the rules system, it is easy to transplant the plant.


")


