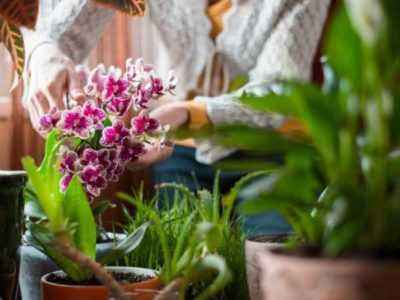
An exotic orchid plant is often chosen by people to decorate their home. When buying an orchid, you need to understand that it requires careful care at home. However, if you know the characteristics of the plant and follow the basic rules for growing, caring for an orchid after purchase will not be difficult.
- Description of the Phalaenopsis orchid
- Species diversity
- Home care
- Substrate selection
- Pot selection
- Watering <
- Lighting <
- Temperature <
- Humidity <
- Feeding <
- Transplanting
- Orchid propagation methods
- Pruning peduncle
- Diseases and pests
- Conclusion <
Orchid care after purchase
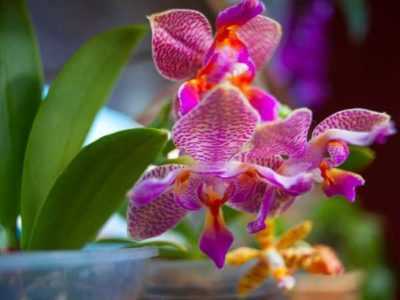
Description of the Phalaenopsis orchid
The homeland of the orchid is hot and humid tropics, thanks to such conditions the phalaenopsis has beautiful and abundant flowering of various colors and shapes. In real life, orchids live on tree trunks or on rocks, this type of life activity relates flower to the genus of epiphytes.
Phalaenopsis has a developed root system, the roots are round, up to 0.5 cm in diameter. The deciduous cover is green, the leaves themselves are fleshy, smooth, green and oval, or ellipsoid in shape. The orchid blooms 2-3 times a year, flowering is long, up to 3 months, the dormant period is not clearly indicated.
Species diversity
The main varieties of orchid 70, hybrids many more.There are conventionally giants up to 1 m high, and dwarfs no more than 30 cm. The color scheme is varied, there are white, yellow, purple, raspberry and others.
Care for the plant at home
To care for the orchid must be regularly, without the conditions necessary for growth and flowering will be accompanied by problems.
Substrate Selection
The main component of the substrate is the bark. Before planting, rinse and soak the bark for a couple of days in water, so that it will gain the moisture needed by the roots. Choose different fractions of the bark, as they put large ones on the bottom of the pot, and small ones in the middle and on the top.
Cover the top layer of the bark with moss, sphagnum will do, it will retain moisture for a long time. There should be no peat and nitrogen fertilizers in the soil. When transplanting, put claydite or gravel at the bottom of the pot, 2 cm thick, they will serve as a drainage cushion for the soil.
Choose a pot
Orchid roots like light, they are actively involved in photosynthesis and require good access to light, and the grower needs to control their condition. It is convenient to keep phalaenopsis in a transparent pot, with smooth walls and drainage holes, for good air exchange.
Based on the size of the flower, choose the size of the pot, if it is small, the roots are injured. If there is a lot of space in the pot, excess moisture will collect and the roots will begin to rot.
Watering
The main indicator of moisture is the roots themselves, more precisely their color.Green or light green do not need watering, have become silver – water. Another alarm is the lethargy of the leaves, as well as not enough moisture. Water should be soft, room temperature, orchids like melt or rain water. When watering, follow the order, let the substrate dry. Also alternate the method of watering, water the substrate for one week without touching the leaves and trunk of the plant, and next time place the pot in a large container with water for 20-30 minutes.
After watering, give excess water drain, twist the pot, tilt it from side to side. In winter, focus also on the dryness of the substrate, but replace the watering with spraying.
Lighting
At home, it is difficult to adapt phalaenopsis, in nature the light intensity changes throughout the day and time of the year. For the development and flowering of orchids, a change in lighting and a large amount of it are vital. In spring and summer, keep the pot on the eastern windowsill, and in winter and autumn, the southern and western windows are better.
If there is insufficient lighting, use fluorescent lamps, you should not use them constantly, but only in the evening from 18:00 to 22 : 00 a.m. When choosing a place for phalaenopsis, exclude direct sunlight, they will leave burns on the foliage.
Temperature
The flower is not likes temperature differences
Regardless of the time of year, the temperature for phalaenopsis should not change much. In summer, consider optimal 20-25 ° C, in winter at least 20 ° C. Also take into account the night temperature difference, it should not exceed 5 ° C.
Humidity
Humidity in apartments usually ranges from 40 to 70%, this suits the orchid. At phalaenopsis, flowers and buds dry, the leaves turn yellow, which means that humidity is not enough, use a household moisturizer. Regularly arrange a warm shower for the plant, spraying it abundantly.
Top dressing
In flower shops there are special fertilizers for orchids, they have step-by-step instructions on how to dilute the drug and use at home. Feeding should be carried out during flowering, in the summer 2 times a month, in the winter – once a month. Avoid fertilizers with potassium and phosphate salts, phalaenopsis tolerates them poorly, discards leaves and stops flowering.
Transplant
There is no more stress for a plant than a transplant. To plant an orchid in a new soil is allowed only after flowering, during dormancy. A transplant is necessary in several cases, if the roots have grown so much that they do not fit in the pot, then divide the plant during transplantation.Or in case of damage to the substrate and damage to it by diseases or pests. Without an obvious need, it is better not to do it more often than once every 2-3 years. After the transplant, the orchid wilts and becomes sick. There are important points and stages in the transplant:
- remove the flower from the pot, cut it with scissors without damaging the roots, and put the flower in a basin;
- thoroughly rinse the roots, remove the dry and damaged areas, remains of substrate;
- examine the trunk, remove dry and yellow leaves, dry peduncles;
- leave phalaenopsis at night, to dry the roots;
- prepare a new substrate and pot, transplant the orchid and water.
Work only with a clean tool, sanitize all sections of the cuts and coat with crushed activated gleam.
Orchid propagation methods
Orchids have three methods of propagation.
- By children – the simplest and most common. The procedure is best carried out in the first half of winter, a month after flowering. During this period, small children appear on the bases of the outlet and peduncles, over time they take root and are ready for transplantation. They are separated from the mother plant when the children reach a height of 5 cm.To stimulate the appearance of the baby, to awaken the sleeping kidney, increase the room temperature to 25 ° C, make a semicircular section on the sleeping kidney, choose the one that is closer to the base of the peduncle arrow.After a while, the flake will cover the slice, remove it with tweezers and treat the slice with a growth activator. A month later, at a high temperature, a baby will appear.
- Cuttings – it is difficult to carry out at home, greenhouse conditions are needed. This type of reproduction is carried out during the resting period of the plant. Use lateral shoots, at least 15 cm in length. Treat the pruning shears with alcohol and cut the shoot at the base, the cut should be treated with crushed coal. We plant the cuttings in a pot with the cut down, care must be taken, like an adult orchid.
- Division of the outlet – suitable for most phalaenopsis. First, prepare the soil, mix the bark and moss, slightly moistening them. With a sharp and sanitized secateurs, cut off the top of the flower, grabbing a couple of leaves and roots, put it in the prepared substrate. Immediately after the procedure, it is necessary to process the cut with crushed charcoal.
Trimming the flower stalk
When trimming, make sure that the flower stalk is dry and yellow, if you cut earlier, a new one flowering is late. If there is a kidney on the peduncle, then pruning is carried out higher so as not to damage a possible baby.
When cutting, leave a small stump, it is more convenient to care for the cropped area. Further, the processing of the cut with crushed coal is required. After trimming, transplant and provide optimal orchid care.
Diseases and pests
After the purchase, inspect the plant for pests. A variety of slugs, millipedes, snails, spiders and ticks like to live in the leaves of the phalaenopsis. They dine on the foliage, trunk and roots of the plant, preventing the orchid from growing and developing normally, blooming in the future. Pests are collected manually, the flower is sprayed with warm water and a pest preparation, it is advisable to take it in the store during the purchase of the plant itself.
Fungal infections are dangerous for the plant, they provoke rotting of the roots and trunk, and occur when watering excessively. If the fungus is not stopped in a timely manner, it will hit the flowers and leaves, the plant will die. Use an antifungal drug, fungicides for prophylaxis, also transplant into a new substrate.
Bacterial infections also cause great damage, leaves turn yellow, darken over time, become lethargic and wrinkled, soaking spots with an unpleasant smell of rot appear. Isolate the orchid, trim the affected areas and treat the sections with iodine. After treatment with an antifungal drug, the flower is returned to its original place.
Most dangerous are viral diseases, you cannot diagnose them without laboratory tests, and the plant withers before our eyes. All that can be done is to provide her with the most careful and attentive care, isolating herself from other plants and letting her heal on her own.
Conclusion
The orchid gets used to the conditions in the greenhouse, after shopping, give her time to adapt. Provide optimal orchid care and it will repay you with abundant flowering and good health.


