As beekeeping practice shows, the ability to make something with your own hands is a real help in the development of an apiary. All that is required to improve the design of the hives and the existing equipment is a little time, artisan hands and your desire to create. And the recommendations of experienced colleagues based on their own experience will help in this interesting business.
The content of the article
- 1 Making the chisel comfortable
- 1.1 Chisel template for arranging frames
- 2 Homemade apiary knife
- 3 Homemade electric knife
- 4 Siphon sprayer
Making the chisel comfortable
A chisel is a must-have tool for any beekeeper. It is used instead of a lever. She lifts the adhered frames, with her help they dismantle the second cases and store extensions. And in spring, the chisel is indispensable for cleaning bee houses.
The only drawback of this equipment is the inconvenience in cleaning the corners in bee houses with a blank bottom, as well as the joints of the walls with the bottom, folds, inner sides of the slats on the frames. For this reason, metal “assistants” are used – various scrapers and knives, which significantly lengthens the cleaning time and complicates the work.
From Vinnitsa region from P.M. Slobodyanik was advised to do the following:
- the extended tip of the device, which has a straight edge, must be cut strictly at an angle of 55 degrees;
- and sharpen the ends with a file.
After that, the tool easily penetrates into all corners, and when removing wax deposits, bee droppings and other contaminants, it acts like a regular knife. It becomes easier for them to pry on extensions and housings.
And G. Moskvin from Solikamsk advises equipping the flat end of the new instrument with steps 5 millimeters deep. The notches allow you to correctly adjust the distance between the frames depending on the season:
- the first step, which has a width of 8 mm, is used in the spring;
- the second, 12 mm wide, is ideal for summer.
If the chisel is thick enough (0,3-0,4 cm), by turning it slightly to the right or left, it will turn out to additionally increase the interframe distance by another 1 millimeter.
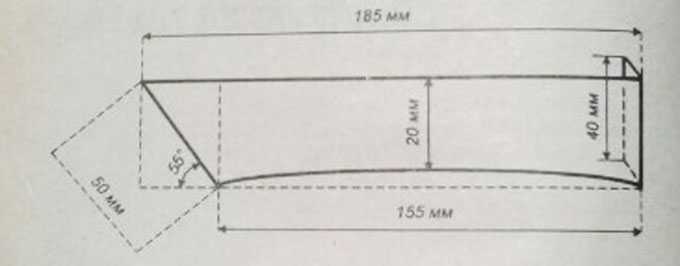
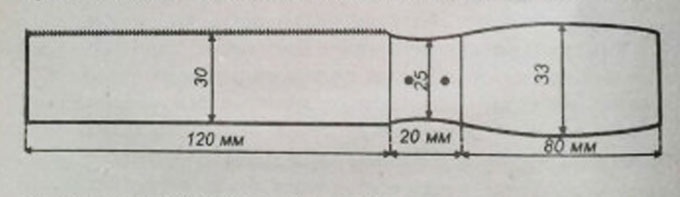
And the third option for modernization is the combination of an ordinary chisel, a beekeeper’s knife and a handy saw in one tool.:
- For the manufacture of such a universal tool, a piece of a band saw 12 cm long and 3 cm wide is taken.
- From the side opposite to the teeth, the saw is sharpened – an edge is obtained like a knife.
- The saw is carefully sharpened from the end – it is given the shape of a sharp and rather thin chisel.
- The resulting tool is placed on a suitable wood handle, as shown in the figure below.
This convenient design was developed by F.I. Zyryanov from Manzovka, Primorsky Territory.
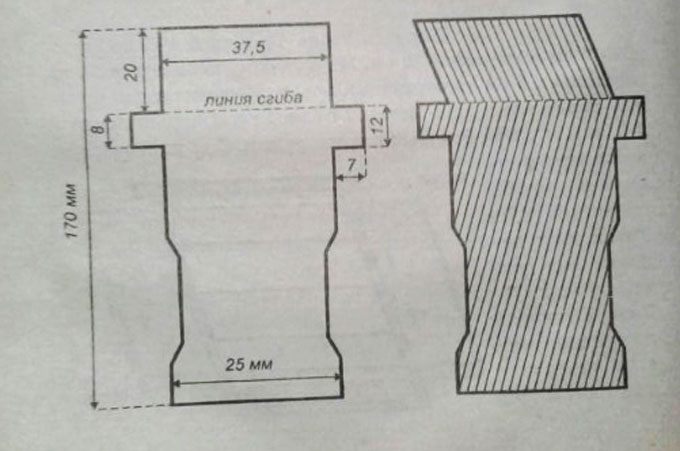
Chisel template for arranging frames
The template was developed by G. Moskvin from Solikamsk. It is made exactly according to the dimensions required for placement:
- the width of the curved end is 37,5 millimeters – this is the width of one frame together with the adjacent street;
- the right ear of the instrument is 12 millimeters, which corresponds to the normal width of one street;
- and the left ear is equal to 8 millimeters – this is the distance between the frames in early spring, which is necessary when reducing nests and increasing the strength of families;
- the narrow end is made in the size of 25 millimeters – it is equal to the upper bars of the frames.
Homemade apiary knife
A knife for beekeeping can be built from a worn scythe or a hacksaw blade of suitable width.
A serrated knife, developed by F.G. Tverdiy from the city of Chernigov, allows you to remove the seal when downloading honey without preheating the blade.
It is made as follows:
- A piece for the future handle is measured on the hacksaw blade. This section heats up well on the fire of a gas stove and folds in the same way as on a factory tool of this type, adapted to unseal honey frames.
- After that, all the teeth of the blade are sharpened on an emery stone.
- The handle is made of PVC tube with a diameter of no more than 10 millimeters. You can also use wood, but this is less practical and convenient.
When working, such a serrated knife does not crush cells, does not get stuck in honey – an even cut is obtained.
As a second option for this homemade apiary, the beekeeper suggests using a worn out braid. In this case, both sides of the homemade blade are very sharp. Tool dimensions: length – 10, width – 30-40, thickness – 1 millimeter. It is a lightweight and convenient attachment for working with sealed honeycombs.
A zigzag iron rod with a pointed end is attached to the blade using three small rivets. Additionally, the rod is soldered with tin. This allows all corners of the attachment to be smoothed and strengthened. Then a wooden handle is put on the sharp end.
You need to keep such a knife absolutely clean, and during work, periodically clean the crumbs of combs and honey adhering to the blade.
Homemade electric knife
The electric knife is the dream of many beekeepers. It does not need to be heated in water, which means that additional moisture will not get into the honey.
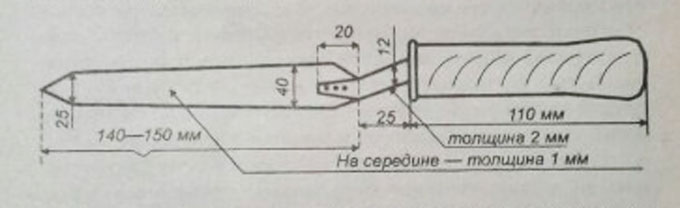
You can assemble the tool yourself using an old braid:
- A blade with a length of 150 and a width of 50 millimeters is made from the workpiece.
- Two holes are made at one end of the workpiece. Here, with the help of small rivets, the rod of the electric soldering iron will be attached. From the underside of the rivet you will have to grind off flush – the surface should be smooth!
- The knife is attached to an ordinary electric soldering iron, the rod of which bends – two knees are obtained. The end is made flat and two rivet holes are punched on it.
- After assembly, the tool is sharpened on both sides – the cuts are slightly directed upward, which will allow in the future to easily cut the casing on uneven frames with depressions in the honeycomb.
To prevent the device from overheating, during breaks (while the honey is pumping in the honey extractor), it is dipped in a bowl of water that completely covers the blade.
Siphon sprayer
To treat insects and honeycombs with warm syrup, a regular siphon used to make soda at home is perfect.
A tube of a suitable diameter with a stopper equipped with nine small holes located at a distance of 0,5 centimeters from each other is put on its tip. On the reverse side, a bicycle nipple is mounted, through which air is pumped into the sprayer.
This container can hold up to two liters of syrup. Siphon sprayer used:
- when transplanting new queens;
- when combining two nests;
- when pouring top dressing into honeycombs;
- when setting printed honey frames with already sugared food.
You may be interested in other information on this topic:
We pull the wire correctly – homemade products for working with frames
How to impose frames – using effective homemade products
All of the listed homemade beekeeping products can be made by anyone with the necessary mastery skills. They are essential items in any apiary – they will equally interest both beginners and experienced amateurs or professionals.


 as a honey plant")


 as a honey plant")


