Transplanting a house orchid is an important condition for caring for them. This procedure is simple, but still requires some knowledge. Therefore, today we will tell you in which cases and how the orchid is transplanted at home.
- In which cases
- Transplant dates
- How to choose a pot and substrate
- Pot parameters
- Soil composition
- Transplant technique
- Preparation <
- Removing from the pot
- Shoeing the roots
- Preparing the pot
- Planting
- Fixing in the pot
- Care after transplanting
- Winter care
- Favorable days for transplanting
- Transplanting during flowering
- Transplant process
- Helpful hints
- Transplantation of a purchased flower
- Transplantation of the appendix
- Conclusion <
Orchid Transplant Rules at home
In which cases transplanted
Under normal conditions of growth and development, the orchid should be transplanted at home every 2-3 years. This need is caused by the need of the plant for a new substrate.
Other reasons why the houseplant needs a transplant:
- As it grows, it grows its root system. In the old pot it becomes crowded – it ceases to fully develop and bloom, so it is transplanted.The overgrown orchid is moved to a larger container.
- Needs a transplant and a purchased flower, because the soil into which it was planted is suitable for temporary plant maintenance.
- If the earth smells of damp, mold, you need to transplant the orchid, otherwise it will rot and die.
- Very often the flower does not grow and does not form flower buds for several years then a transplant is needed.
- Grows in a poor and improperly selected substrate, which does not allow to fully develop.
- The roots of the plant have grown to the walls of the pot.
- The orchid that has sprouted also needs a transplant.
- Transplanted and purchased flower a few weeks after purchase.
You can not transplant the plant during flowering. Because rooting takes away a lot of his strength and energy, as a result of which it will perish, without taking root in a new place.
Transplant dates
Transplant Orchid at home. Necessary during the growing season – the growth and development of the aboveground and underground parts. This period coincides with the end of flowering.
For plants that have not yet bloomed, the transplant period falls at the beginning of spring. You can determine the beginning of the growing season by a new leaf that grows from the middle of the leaf rosette.
Stangopeia, Cattleya and Brassia are transplanted in January or February.Species such as dendrobium nobile, cybidium or phalaenopsis are transplanted in late April – early May.
In the summer, replacing an orchid in a new soil is undesirable. At this time of the year, the plant suffers from summer heat, so there is no need for additional stress.
You can’t transplant the orchid in winter, because at this time of year it has a dormant period.
How to choose a pot and substrate
You should sit in special soil
The choice of pot and substrate for transplanting orchids should be approached responsibly. From the variety of flower pots, you should choose plastic, ceramic or glass. Opaque containers are not suitable; you cannot regulate watering and monitor the state of the root system.
Pot parameters
The landing capacity must have the following qualities:
- good air and moisture permeability;
- fast outflow of excess fluid;
- do not overheat and do not supercool under the influence of external temperatures.
The best option is a plastic flowerpot with drainage holes.
The size of the container should be slightly larger than an earthen coma. Do not use too large a flowerpot, in which there is a lot of space. In it, the plant builds up the root system for a long time and does not bloom soon.
You can transplant the flower into a clay unglazed container. However, with subsequent transplants, problems may arise with the separation of the root system, which grows to the rough surface of the walls. An alternative is a glazed ceramic flowerpot with drainage holes. It has smooth walls, so there will be no problem with removing roots.
Soil Composition
Orchids are epiphytic plants, therefore, flower soil is not used for planting or transplanting them, as for other indoor flowers.
The substrate for orchids consists of large particles of pine bark, sphagnum moss. In addition, expanded clay, crushed fern root and coconut fiber are added, which improves the quality and nutritional value of such a mixture.
Some flower growers have successfully used the soil improver – Tsioflora. This is a universal primer that contains silicon and many other nutrients. Such a substrate perfectly retains moisture, allows air to pass through. Therefore, the roots in it will not decay and become dry.
Moisture-saving soil is suitable for transplanting adult, overgrown specimens. In it, you can reanimate a dying orchid and plant cuttings separated from the dead flower.
Transplant technique
Instructions for performing this procedure at home are simple and affordable for each grower .
Preparation
It is necessary to prepare the landing tank in advance.To transplant an orchid, you will need a new pot 2 cm larger than the previous one. It is better to use a transparent plastic pot. So you can monitor the state of the root system and optimize the care of the plant as much as possible.
Orchid transplantation at home after it has faded is carried out with a complete replacement of the old substrate with a new one. Therefore, try to cook it in advance. Also, for this manipulation you will need a sterile knife, garden shears and a stick for support (bamboo).
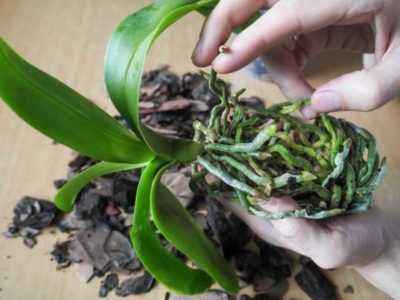
Removing from the pot
Before transplanting a home orchid, it should be thoroughly moistened. This will facilitate the process of extracting the roots and eliminate the risk of injury.
If the roots are attached to the walls, carefully draw a knife along the edge of the container to separate the earthen lump from the walls of the flowerpot. If the root system cannot be removed in this way, the flowerpot should be cut so as not to injure the roots.
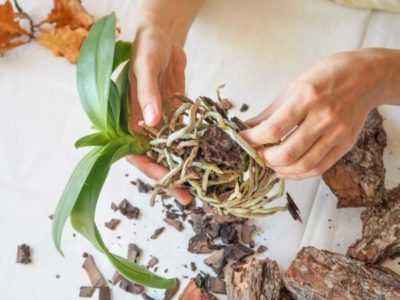
Cleaning the roots
Carefully straighten the roots that are woven together and brush them off old soil. After that, all the roots that have dried and rotted are cut. Soft and sluggish roots are also removed, because over time they can cause the development of root rot. The cut-off areas should be treated with charcoal powder.
If you find parasites on the roots, immerse the root system in water for a while and the insects will die.
Preparing the flowerpot
Having a plastic pot, make sure that it meets all the requirements of this indoor flower, which were mentioned above. At the bottom of the tank there should be several holes for the outflow of water. If they are not there, do them with a screwdriver or drill.
The bottom of the pot is filled 2-3 cm in height with a nutrient substrate for planting orchids or with a drainage layer (foam, expanded clay).
Drainage material provides an outflow of excess water and prevents the process of root decay.
Planting
The roots are laid on top of the substrate. All voids between the roots are filled with a mixture of pine bark and moss-sphagnum. To shrink the substrate, lightly tap the walls of the pot.
Do not force the roots of the plant into the pot. It’s okay if they stay on the surface. The plant will be able to nourish moisture from the air with air roots, provided that the room has high humidity.
Fastening in a pot
For stability, the plant is fixed in a vase with a bamboo stick . It is installed next to the stem of the plant, trying not to damage the roots when deepening.
Care after transplantation
According to the rules of orchid care and transplantation, you should not rush to feed them. The plant should be given time to adapt to the new land. The first top dressing is introduced only a month after the transplant.Watering is carried out only on the 5th day after you moved the plant to a new container.
Rules for caring for the orchid after transplanting: the flower should be placed on the windowsill, where there is no direct sunlight. Otherwise, it will get burns and die. An equally important condition is the creation of an optimal temperature during the day 20-23 ° and 15-17 ° at night.
Care in winter
In winter, when the plant begins a dormant phase , watering is reduced to 1 time per month. Top dressing is completely excluded. This condition applies to all species, with the exception of the Phalaenopsis orchid. This flower does not have a pronounced dormancy period, therefore, all year round it needs regular top dressing, good lighting and warmth. In addition, the plant is regularly watered.
Favorable days for transplantation
You can correctly transplant an orchid at home according to the lunar calendar. Favorable days for this procedure:
- in March – 1, 19-30;
- April – 17-29;
- May – 16-28.
If you decide to transplant an orchid in the fall, then nail the most important numbers are:
- September – 10-24;
- October – 11-23;
- November – 9-22.
This plant should not be transplanted on the day of the full moon and lunar eclipses. According to flower growers, if a plant is damaged during the transplant, it will never recover and after a while will simply die.
Transplanting during flowering
We figured out when it is preferable to transplant an orchid at home.
There are several critical situations in which you need to transplant an orchid immediately, despite Vatan:
- An unscheduled transplant flower made because of the disease or infection by the harmful insects.Understand that the orchid is withering and should be transplanted urgently, you can black, shriveled roots or leaves that turn yellow, dry and curl. In this case, the diseased orchid is removed from the old container, treated if necessary, and transplanted into a new pot.
- A plant that has many sluggish, yellowed leaves also needs replanting.
- The peduncle rots , foliage and stems, which is possible from an excess of moisture or the development of a dangerous disease.
- If the orchid released the shoot, but it died. From this offspring you will get a new plant if during it you separate from the adult bush and transplant it into a new container.
Transplant process
Transplant the orchid with the peduncle should be carefully, because during the flowering period it is especially vulnerable and does not always take root in a new place.
First, the peduncles are trimmed. Trim each arrow should be 2-3 cm from the top. Such a rejuvenating haircut makes it possible to obtain new sprouts.
Before the procedure, abundantly irrigate the roots with warm water. After about an hour, the root system is removed. Without shaking off the old soil, the roots are lowered into warm water, washing away its remains under running water.
All roots that have become rotten and look unhealthy should be cut with a sharp knife. Place the slices sprinkled with charcoal powder, dried. The same images are used to cut leaves that wither, turn yellow and dry out.
A new container is dipped in a highly concentrated solution of potassium permanganate, dried. Then fill with drainage – 1-2 cm (pebbles or expanded clay), 1/3 nutrient substrate. Then they lay the long roots of the plant and sprinkle them with pine bark on top.
Useful recommendations
To minimize the stress that a flower-bearing plant can get during the transplant, follow the rules:
- after removing the remains of the old substrate, the roots of the plant should be dried for 8 hours;
- before laying in the pot, the drainage is calcined in an oven or treated with boiling water;
- strongly overgrown orchid before planting in a new pot should be divided into parts and planted by to large containers;
- a transplanted flower requires more careful care and attention at first.
Transplanting a purchased flower
Transplant purchased Orchid not immediately, but 2-3 weeks after acquisition. First, the plant is quarantined in a room closed from other plants. During this time, you can determine its condition and check for diseases and pests. In addition, the plant needs quarantine in order to get used to the new habitat.
The purchased orchid is transplanted from the small pot to the pot more than 1 cm larger. An ordinary plastic or ceramic container with drainage holes is used.
The transplant procedure itself is no different from the transplant procedure of a home flower. The care of it after planting in a new substrate and pot remains identical.
Transplant transplant
If your flower dies and it can no longer be saved, but a process has appeared on it – you can get a new instance from it. Siblings are cut off at the point of contact with the mother bush. Places of cuts are treated with carbon powder. Then they allow it to dry for several hours and plant it in a nutritious and moistened substrate from sphagnum moss and coniferous bark.
A prerequisite is that there must be several leaves on the shoot, otherwise the transplant procedure will not give a positive result. The shoot is abundantly watered from a watering can, spilling water along the edges of the walls. Caring for a new copy is the same as for adult flowers.
Conclusion
The secrets of transplanting from flower growers below will help you easily master this process.
The procedure for transplanting Phalaenopsis orchids as well as other plant species of the Orchidaceae family is not time-consuming and expensive. The above methods of its implementation will help to implement it easily and successfully.


