In progress In the development of farming, people all the time tried to facilitate work and speed up the process of planting potatoes. Do-it-yourself potato planter for a walk-behind tractor is an excellent way out of the situation.Such a device not only greatly facilitates labor, but also helps to plant potatoes at an equal distance, to fertilize.
- Application Specifics
- What
- Consists of the Assembly Process
- Assembling the Container
- Wheels and Rippers
- Conclusion <
Making a potato planter for a do-it-yourself walk-behind tractor
Specificity applied Iya
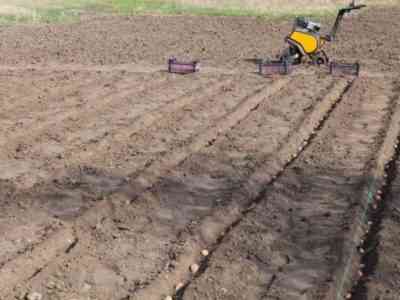
A do-it-yourself planter for a walk-behind tractor will have a rather large mass, so a ballast is mounted on the front of the MTZ or mini tractor. If this is not done, the device will turn over during operation. Do-it-yourself potato planter for walk-behind tractor is equipped with devices that allow the operator to control the machine normally. It is best to equip the planter mechanism with an adapter for the walk-behind tractor.
There are several nuances in using a homemade planter that you need to consider in advance.
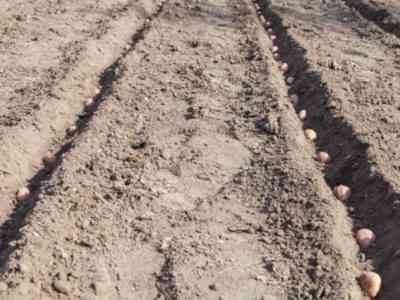
The principles of the potato planter are simple:
- into the container put about 20 kg of potatoes, if 2 containers., in the second fertilizer is filled up;
- the optimal speed of the walk-behind tractor is 1 km / h;
- the active mechanism alternately moves the potatoes into the pipe;
- the wheels are in motion at an angle of 40-45 °, which allows you to fill up the wells;
- the loosening mechanism cultivates the soil immediately during movement, which prevents its compaction due to wheel pressure.
What it consists of
To understand how to make a potato planter with your own hands, you first need to understand its work. The home-made potato planter in terms of work features and purpose is absolutely no different from the production counterparts for MTZ, mini tractor, L 207.
The home-made simple potato planter includes a number of components that will need to be made:
- frame;
- container for planting material (if desired, you can attach the 2nd container for fertilizer);
- mechanism;
- cultivators;
- wheels .
A homemade planter can really be assembled quickly, it all depends on the desire and skills of the farmer. It is important to remember that when adding additional elements (a second container for fertilizers, 2 devices for planting root crops), mobility and performance decreases.
The process of assembling the mechanism
We make it easier for ourselves
To make a potato planter with your own hands, you need to calculate its dimensions, depict the drawings in detail. The whole mechanism rests on the frame. In our version, it is made of several pieces of a channel, welded together, and horizontal side members, connected by 3 elements across. The frame dimensions are 2 mx 25 cm.
The front part of the side members is equipped with a steel arch with a fork for mounting the wheel mechanism. Lamellar mechanisms are attached to the frame on the sides for securing the pipes under the seeds and soil-cultivating discs. After carrying out all the above manipulations, the holder (frame) is strengthened by welding strips of steel sheet onto it.
The drawings should reflect all the moments of reinforcement of the structure. Not only the frame needs strengthening, but also the arch, to which the fork with wheels is attached. Strengthening the arch is done using metal strips of 4 mm. Drawings of the hopper can be sketched separately. Typically, a container for seeds is made no more than 20-25 kg of potatoes. As a bunker, you can adapt the tank from a deteriorated washing machine.
After that, supports and steps consisting of a metal sheet 5 mm thick are attached to the side members. Drawings may depict the seat separately. For its installation you will need a metal corner measuring 4.5 x 4.5 x 0.4 cm.It will be a support to which a board upholstered with foam should be attached. Then install the wheel support.
The wheel support should be the size of the main frame. Spikes are mounted on the ends of the support, fastened with steel pins. The drawings show the dimensions of each part. For example, a 5 x 5 x 0.5 cm metal bar is used to maintain the cultivators. A furrow cutter is located at the very bottom of the structure.
Assembling the container
To make a hopper , plywood sheets from a thickness of 80 mm are needed. After cutting, all elements are treated with a safe compound and joined using steel corners. The finished container is painted with waterproof paint.
For the manufacture of the container, you can pick up any unnecessary wooden or metal box. In the container you need to do, to which a pipe for sowing seeds will be mounted. The diameter of the pipe should not be less than 10 cm.
Wheels and cultivators
Home-made potato planter for walk-behind tractor can be equipped with factory wheels purchased in the store. You can also perform the wheel mechanism yourself. The wheels are made in the form of wide cylinders. This allows you to properly distribute the pressure on the ground during movement and reduce its compaction.
The hubs of the wheel mechanism are mounted to the frame by welding, mounted on bearings.Using bearings, the wheels are mounted on spikes mounted on the axle (this is necessary to prevent dirt from entering the bearings). Then begin the assembly of the frame on which the rippers will be mounted. It is best to design it from iron corners, they are much more reliable than a regular solid square.
Mount clips for racks of loosening parts on a square bar on both sides. The distance between the clip and the stand itself should not be more than 1 mm. The pipe for planting is selected with the largest diameter. This avoids the deformation of the mechanism in contact with the soil. On the outside, a coulter is attached to it, cutting the furrows.
The furrow cutter is made movable in order to be able to regulate its work by deepening the sprouted potatoes into the ground. Most often, regulation is done by loosening the stirrups and moving the seeder vertically. Disk parts for closing up the soil and forming ridges are made of parts from the seeder СО-4,2, only it will be necessary to modify them a little. To do this, expand the hub holes with a drill. Standard equipment assumes only 1 bearing marking 203, which is completely unsuitable for our purposes.
Conclusion
Manual planting of potatoes takes a lot of time and energy. For a long time, people have learned to make home-made mechanisms for cultivating the soil and planting in order to facilitate their work, save time, and also make the rows smooth. Planters for a walk-behind tractor became an excellent option.
With such a device, even a two-row landing scheme is carried out in a short time.Using a planter, you can not only ease the work, but also adjust the distance between the rows, the holes. To properly assemble the landing gear, you must first depict the drawings in detail and carry out the corresponding calculations. Do-it-yourself potato planter on a walk-behind tractor will cost much cheaper than the factory counterpart.


