When breeding chickens in an incubator, a brooder is required in which they will be kept in the first days of life. Many people make this device on their own without buying it ready-made, because the price of finished boxes for chicks is often unreasonably high. And it’s easier to make a brooder for all chickens with your own hands, choosing the right design and the right materials.But in the manufacture it is necessary to take into account a number of requirements that a fully assembled device must meet. How to make a chicken brooder with your own hands? What determines the size of the broiler for chickens?
- Selection of materials for the brooder
- Start of assembly of the brooder
- Frame for the brooder
- Walls and doors of the brooder
- Making the doors of the brooder
- Further arrangement of the premises
- Installation of drinking bowls and feeders
- Conclusion
DIY chicken brooder
Material selection brooder for
A simple brooder for young chicks – this is the usual cardboard box or wooden box large enough. But, although these are the most inexpensive options, they have certain disadvantages. If we talk about a cardboard box, you need to understand that it is easily destroyed, and just as easily ignited. A wooden packaging box needs additional insulation. And both of these options are inconvenient in that it is extremely inconvenient to manually clean them, so you have to make a brooder manually, that is, build a brooder for small chickens with your own hands.
If we talk about sizes, then the classic version of a home-made brooder for newborn chickens is 1 m in length, and 0.5 m in height and width. Moreover, this option is suitable for growing broilers, as well as for ordinary chickens. But for growing broiler chickens, you need to prepare a larger structure, which they will move at the age of 1-2 weeks. However, if you make a brooder for these large chickens, then they will be able to live in it up to a month old. Here are the materials used for assembly when we make a brooder for all chickens with our own hands:
- Cardboard from cardboard boxes. Cheap material, but it is too easily ignited and destroyed, which is why it is not always suitable. Its only plus is its low price.
- Plastic. Plastic boxes are used by some farmers, but they have certain disadvantages. Firstly, plastic can begin to melt with constant heating. Secondly, it does not always keep heat well, and good, dense and durable plastic is not cheap when buying.
- Metal box. The main advantage of such a material is its durability, although you need to make sure that the metal will not oxidize from the constant effects of wet fumes. Among the shortcomings, it should be noted that the metal box is not warm enough, and it requires additional heating and a warming system.
- Wooden box. The best option of what you can do yourself.Quite inexpensive, with decent thermal insulation, and even a beginner can work with wood.
After selecting the material, you must first prepare a drawing, and in the process decide on the dimensions of the structure, then make sure that there are all the necessary materials and tools are available, after which they already begin assembly and make a brooder for all-age chickens with their own hands. There is one more recommendation: it is impossible to assemble too complex and large construction, which then still cannot be used. It is better to make simpler and more reliable brooders for successful rearing of chickens, which will also be easy to handle.
Beginning the assembly of the brooder
In this room, farmers contain both broilers and and ordinary chickens. But you need to know that the brooder for small broilers in its design is no different from other similar designs. The box size is calculated according to the following principle: a room of 0.5 cubic meters is enough for 100 chickens. Moreover, the height is always equal to half a meter. Well, for fifty children, the already described model is used: a meter in length and a half meter in height and width. Given this density, it is not difficult to calculate the dimensions.
First of all, creating brooders for mass rearing of chickens, it is necessary to prepare drawings of the finished design. If you have the skills of a draftsman, you can draw them yourself or print them on a printer.It is advisable to look at the video, what the typical drawings look like and prepare everything in exactly the same form, then you already have to start making the box. The manufacture of a brooder for small chickens with their own hands begins with the assembly of the frame. A classic wooden version that is most convenient for most farmers will be considered.
Brooder frame
How to make a spacious broiler for chickens? The frame for the brooder needs to be made of durable wooden battens or beams. It should be borne in mind that the collected creation must support the weight of the entire structure, drinkers , feeders and chickens. Still need to treat the tree with a composition against parasites and odors, but you need to use a mixture that does not harm small chickens. All parts of the frame must be made of one type of wood so that they withstand the same load. It is also not worth taking a too expensive tree: it is not beauty that is important, but functionality.
It is easy to calculate how many rails it will take to make a frame. A broiler for 50 chickens needs eight meter-long slats and four half-meter long slats. In terms of size, everything must be observed to the nearest millimeter. An error of even 1 centimeter will lead to an imbalance, which can cause cracks or the box will become unstable. From four-meter rails you need to make legs. In the middle, 2 meter and 2 half meter slats will be attached to them (they will be the basis for the floor).
From above, the last 4 rails are fixed on which the box lid is mounted. Everything must be connected with screws or self-tapping screws. If it is planned to make a litter collection tray in the brooder, then the racks should be 4 more. It is necessary to make another 2 meter and 2 half meter rails. They are fixed under the base for the floor to get a gap into which the pallet will enter. And the floor itself in this case must be made of a fine mesh, along which the chicks will walk.
Walls and doors of the brooder
After the frame has been assembled, it is necessary to attach the walls and the roof to it. As already mentioned, the bottom should be made of mesh and a removable pallet.And here it is worth repeating one recommendation: although it is not difficult to build a brooder, it is useful to look at the photos and videos, as professionals assemble it with their own hands. But you need to remember that different materials require different investments and differ in cost and durability. Of wood, it is best to use dense plywood with a thickness of 10 mm.
The walls are made of solid sheets of plywood, so that there are no extra cracks. If there is no plywood, then you can take a chipboard or an ordinary board. But making the walls of the boards is somewhat more complicated, since they are more difficult to fit together. And all the chicks, that of chickens, that of quail, are vulnerable to drafts – they are always harmed by such unaccounted ventilation, so the walls are usually made not of boards, but of solid panels of particleboard, fiberboard or plywood. But before you make the walls, you need to decide where the doors should be located.
Making brooder doors
In the vast majority of cases, the doors are made on the side or top of the structure. In some situations they are not made at all, but this case will be considered below. Doors are usually made as follows: 2 sashes in the form of a frame are assembled from plywood or boards. When closed, they should fit snugly to the frame without leaving gaps. They are mounted on special loops that are usually bought at a hardware store. The design of these loops is too complex to be made at home. Then the grid is attached to the grid, after which it is sometimes closed with plexiglass or polycarbonate.
So that the bird feels comfortable in the cage, and its content is not complicated by unnecessary injuries, there should not be any sharp protrusions, so the cage is made so that the fasteners are outside. This somewhat spoils the appearance of the structure, but it protects the chicks from unnecessary injuries. This applies to broilers for chickens as well as those made for quail.
For daily and weekly chickens, normal ventilation is important. When the room becomes too high humidity and accumulates unpleasant fumes, it affects health. In order not to waste extra time on treatment and to simplify the maintenance of babies, you need to think about ventilation in advance. The simplest option is that the door does not completely close with plexiglass and a small clearance is left on top. And sometimes a hole is made in the lid through which the vapors will escape.
Further arrangement of the room
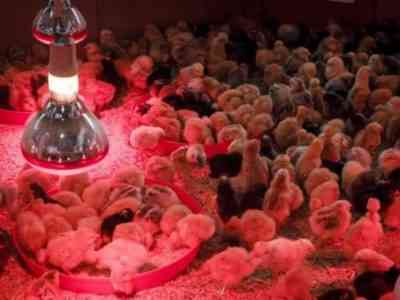
After the case has been assembled, you should think about how to make heating and lighting brooder. Usually infrared lamps are used for this purpose, which give heat and can illuminate the box. Some regulate temperature empirically. Before planting chickens or quails, install lamps and check what temperature they give, then they change the number of lamps, if necessary. On the other hand, there are special devices, relays, which carry out the adjustment.
There is another simple scheme that allows you to simplify the ventilation and heating of the room . A large hole is made in the lid of the box through which all the vapors come out of it, and lamps for heating are installed along its edges. You can also connect a device for adjusting power to them. If you install a sufficiently sensitive thermometer inside, you can easily change the temperature to the desired level, and you can also save on doors by simply making them solid, without windows.
Installing drinkers and feeders
Both chickens and quail will need drinkers and feeders that they cannot turn or stain. In particular, the drinker is often a stable saucer in which there is a bottle of water turned upside down. Drink comes from the bottle as needed, and the vessel itself is often made in the form of a trapezoid with a wide base. Then it is extremely difficult to turn it over. Well, a solid, fine-mesh net without sharp edges does not allow you to get into it.
Here’s how to make a chicken feeder:
“Little chicks always strive to sprinkle food, trample it, and then mix with the litter. Moreover, many of them as a result remain hungry, therefore it is necessary to make a feeder at such a height that the chickens can eat from it, but can not fit. From above, it is covered with an inclined cover, so that there remains a gap in which the beak would crawl.At the same time, the feeder itself is also made inclined so that the feed from it constantly strews in the direction of this gap. Then it will be convenient for the chicks to eat, and the food will not be wasted. ”
Conclusion
It is very difficult to make a chicken brooder. This requires the farmer certain skills and investments. But many materials can be obtained practically for nothing: from old boxes, broken furniture and the like. But the benefit of the assembled design is difficult to overestimate. When using an incubator, a brooder is almost the only place where the chicks can be kept normally.


