The horned beehive is a practical invention of Mikhail Palivoda, suitable for apiaries specializing in the honey industry. Such a house is easy to manufacture and well maintained. It is convenient to transport it.
Apiaries equipped with horned hive systems can roam without problems throughout the summer season.
The content of the article
- 1 design Features
- 1.1 Advantages
- 1.2 Equipment
- 2 Assembly Features
- 2.1 Frame construction
- 3 Material and assembly requirements
- 4 Assembly order
- 5 In conclusion
design Features
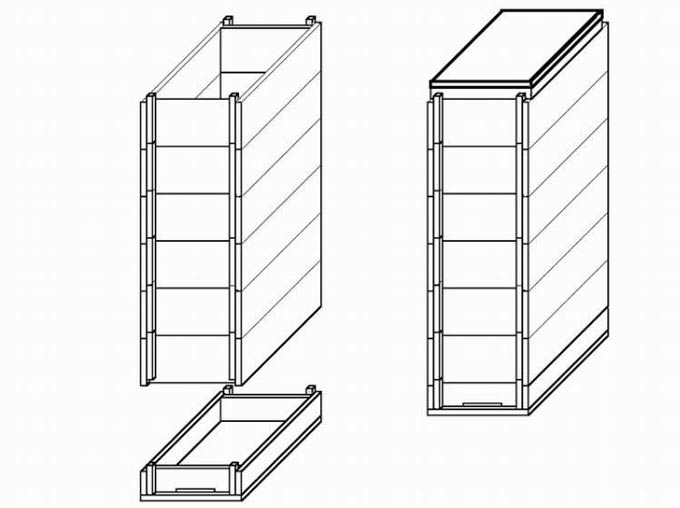
According to the structural solution, the Palivoda hive is a riser (vertical bee house). As for the definition of “horned”, this is an assembly method – the whole structure is block and each individual element in it is universal.
For example, according to Palivoda’s drawings, well-known to experienced beekeepers “Roksolana” hives were made, the blocks from which can be collected in containers for honey or used for their intended purpose – for assembling bee houses.
Advantages
Horned hives have a number of undeniable advantages. Here are the most basic ones:
- In the classic design, the blanks for the bodies are sawn, but not processed on a planer – this was the intention of the author of this model. Therefore, the assembly technology is practically waste-free – even the smallest trimmings of lumber are used to make frames.
- All parts of the structure are interchangeable thanks to the block assembly.
- The number of component parts for each individual house is minimal.
- A horned structure is at least ten times cheaper than a traditional beehive!
- With all the external unpresentability, bee houses assembled according to Palivoda’s drawings solve the main problem of industrial keeping of bees – they reduce the cost of honey production due to the low cost of hives.
Equipment
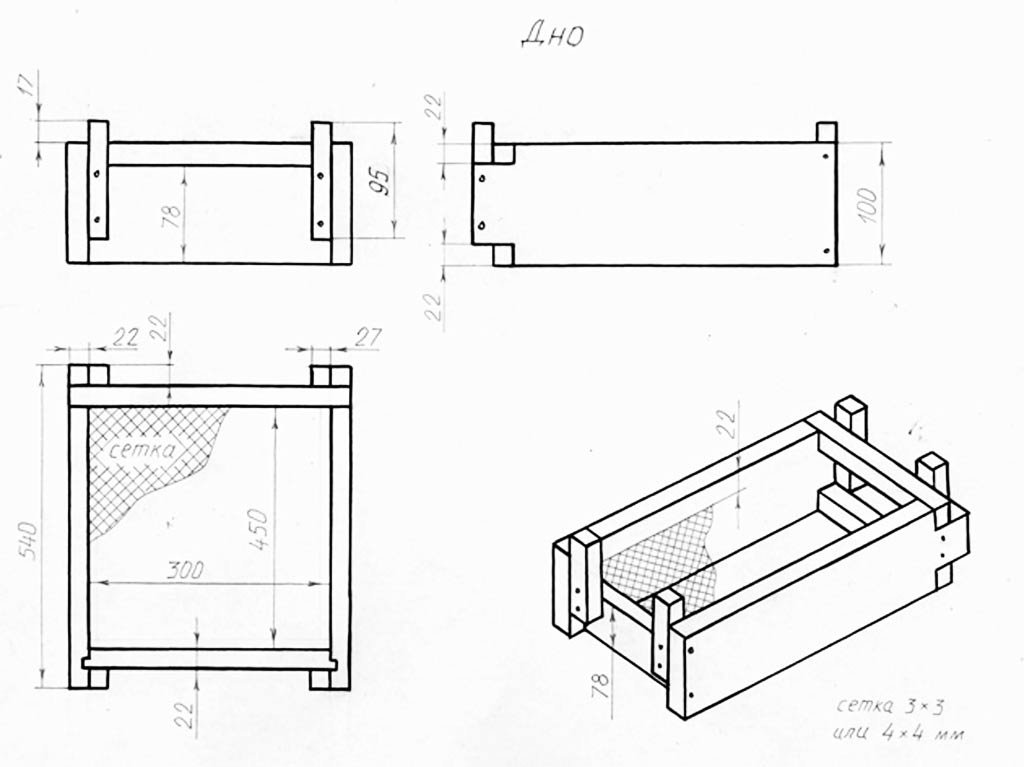
In the finished form, the horned beehive of Palivoda includes the following elements:
- cases or extensions, accommodating 8 honeycomb frames – 5-7 pieces;
- bottom – the usual deaf and mesh for summer;
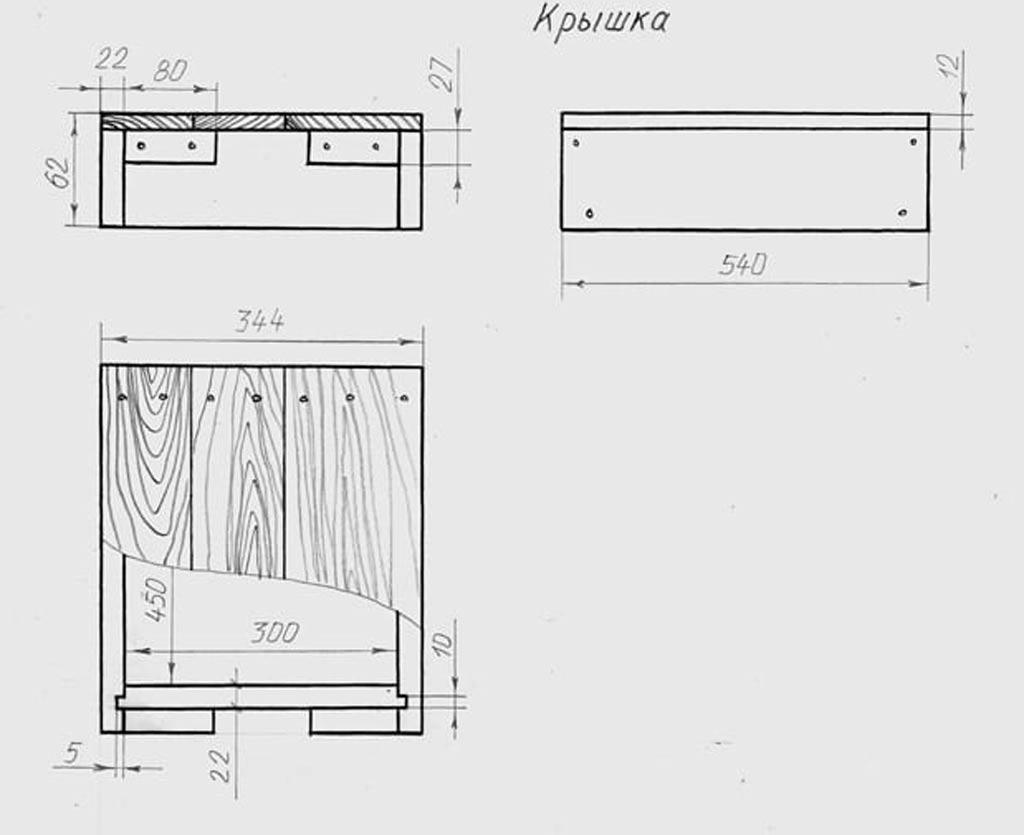
- a frame replacing the ceiling, or a visor with a sub-roof – fits over the frames of the upper body.
Assembly Features
If necessary, the frame can be insulated with foam and covered with sheet metal, turning it into a full-fledged roof. Under the frame, on top of the upper bars of the honeycomb frames, a plastic film is spread – in this design of the hives, it is used instead of laps.
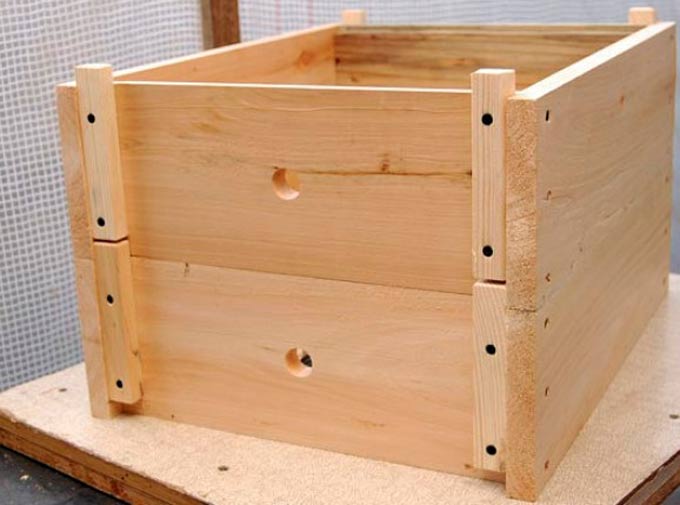
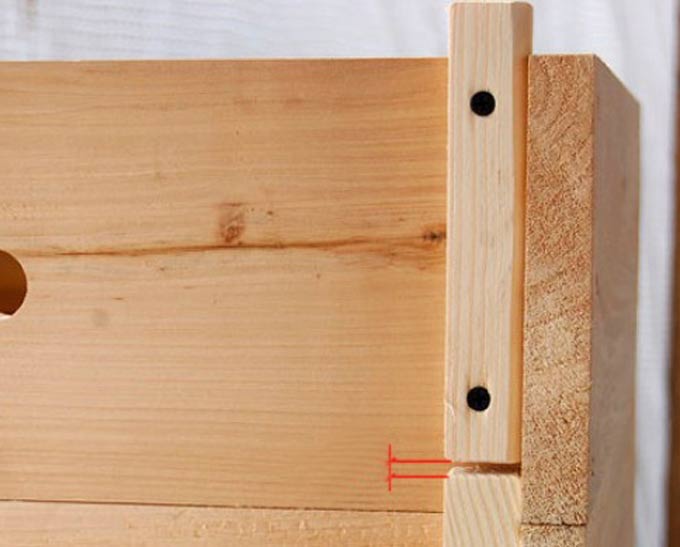
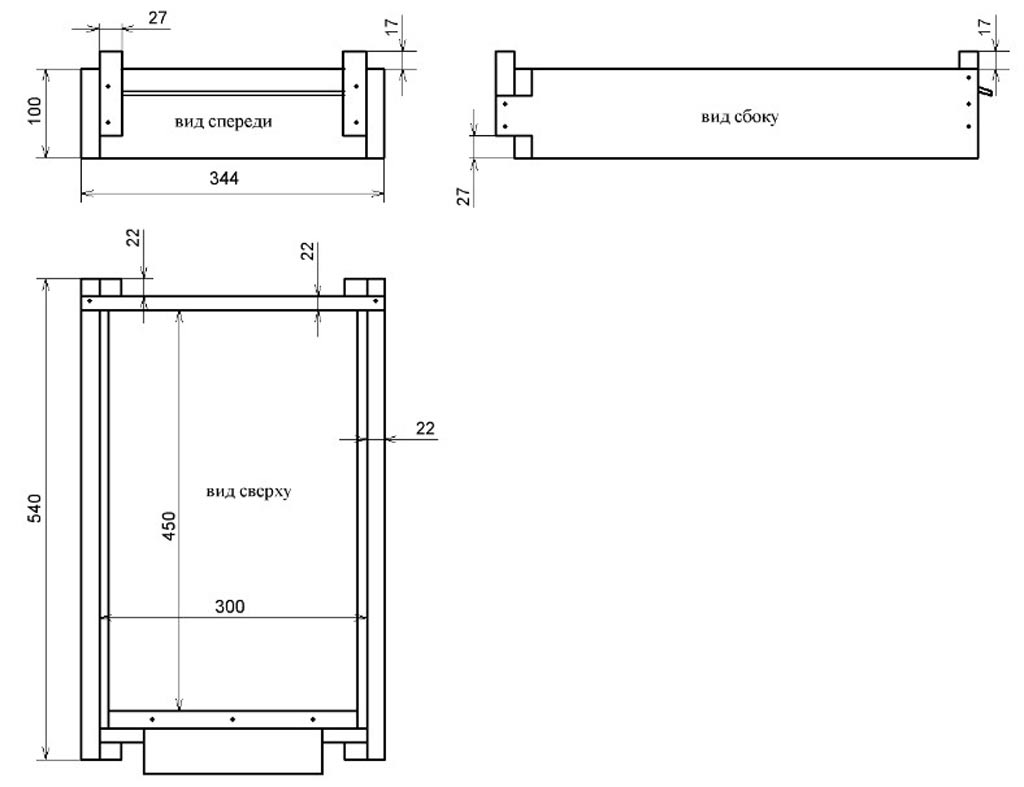
At the junction of the hull sections, there are bars protruding 1,7 cm above them and not reaching the bottom by 2,2 cm. These are the very “horns” from which the name of the structure originated.
The cross-section of the bars is 22 by 27 mm. They are cut out 0,5 cm shorter than the body height. This shortening is an important design feature! When the hives are installed close to each other, you can remove the housing only by taking it by the front and back walls. At the same time, a chisel is introduced into the gap between the bars of the lower and upper sections – when pressed down, this kind of lever raises the body and slightly shifts it back. The resulting gap allows you to freely remove the desired body section.
“Horns” securely fix the entire structure – regardless of the number of installed bodies or extensions, the houses can be transported without additional fastening to each other.
An interesting design solution used by Palivoda for the bottom. Placing a metal mesh here with cells of 3 by 3 millimeters solves the problem of ventilation in the summer heat and the period of active honey collection.
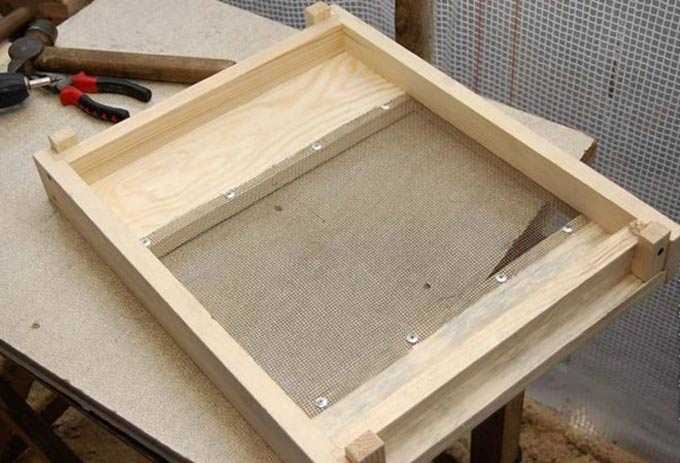
The bees do not get tired during the day (there is no characteristic “beard” on the front wall) and do not ventilate the honey-filled house at night. And the Varroa mites, which fell to the bottom, themselves find themselves outside the nest.
The mesh bottom is advisable to use in large honey families with up to 16 brood frames. At the same time, in ordinary bee colonies, there is a whole bottom all year round.
The blank bottom is a separate body, to which a board 17 mm thick and 200 mm wide is nailed from below. Protruding beyond the bottom by 2,2 cm, it forms the arrival area. In the front wall of the bottom there is a tap hole equipped with a latch.
Such a bottom accommodates 8 semi-frames 435 wide and 145 millimeters high. And if you install the case on top, there will be 8 nest honeycomb frames with dimensions 435 by 230.
Below is a video about a universal bottom-roof suitable for insulating a house and creating layers:
Note: If a mesh bottom is installed, a folding arrival board is attached to the front under the notch on tarpaulin hinges. The width of the front tap hole is 22 mm In the rear wall of the case, just below the mesh, there is a 5,6 cm high ventilation hole for the entire width of the structure, increasing the flow of fresh air.
Another important feature is the presence of a special taphole valve. This is a 38 cm long plank cut in two places at an angle of 45 degrees. It plays both the role of a gate valve and a tap hole. It is impossible to lose it during the wandering and transportation of bee houses, unlike a conventional valve.

The clamping frame is made of bars with a section of 27 by 22 mm. As mentioned above, it serves to press down the polyethylene film, which replaces traditional laps here.
Frame construction
The honeycomb frame has an original design:
The side bar serves here as a permanent divider – its upper part is 37 mm wide, gradually tapering downward. The wedge-shaped transition allows the honeycomb to be inserted into the nest even if the street between adjacent frames is less than 37 mm. Under the light pressure of the hand, the frame freely goes down, pushing the honeycomb apart.
At the top, there is no classic bar equipped with hangers. Instead, a bar with a section of 25 by 10 mm and a length of 470 was installed.
In the upper strip of the store extensions, two openings with a depth of 3 mm are cut for fixing the foundation. No wire is used here! In the nesting honeycomb frames, the wire, on the contrary, is stretched, but not in four, but in five rows.
Material and assembly requirements
For the manufacture of horned hives, a spruce board is used, preferably sawn from dead wood, or a willow that is light in dried form. According to Palivoda, it can be unplaned on both sides, which makes assembly cheaper and easier.
In this case, the thickness of 22 mm must be strictly observed (permissible deviation is not more than 0,5 mm!). Workpiece angles of 90 degrees are another requirement.
The cheapest material is shalevka with a standard thickness of 25 mm. After processing on a jointer, we get the recommended 22 mm.
The bodies are assembled immediately after the boards have been cut! This is done to exclude deformation of the material due to changes in the level of humidity in the carpentry workshop.
If the production is put on stream, the entire assembly of the elements is done on the conductors, which speeds up the installation work.
Assembly order
It is noteworthy that when collecting a horned hive with their own hands, beekeepers willingly experiment, including with its size, equipment. This is clearly evidenced by the video posted below:
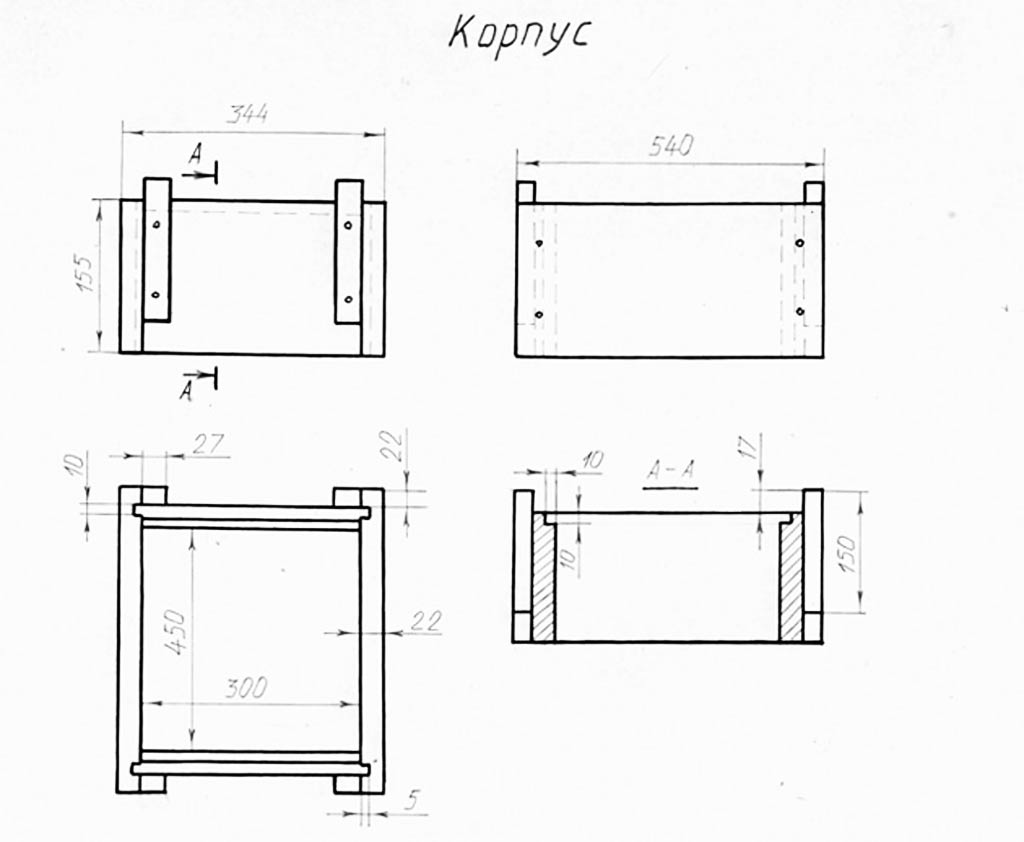
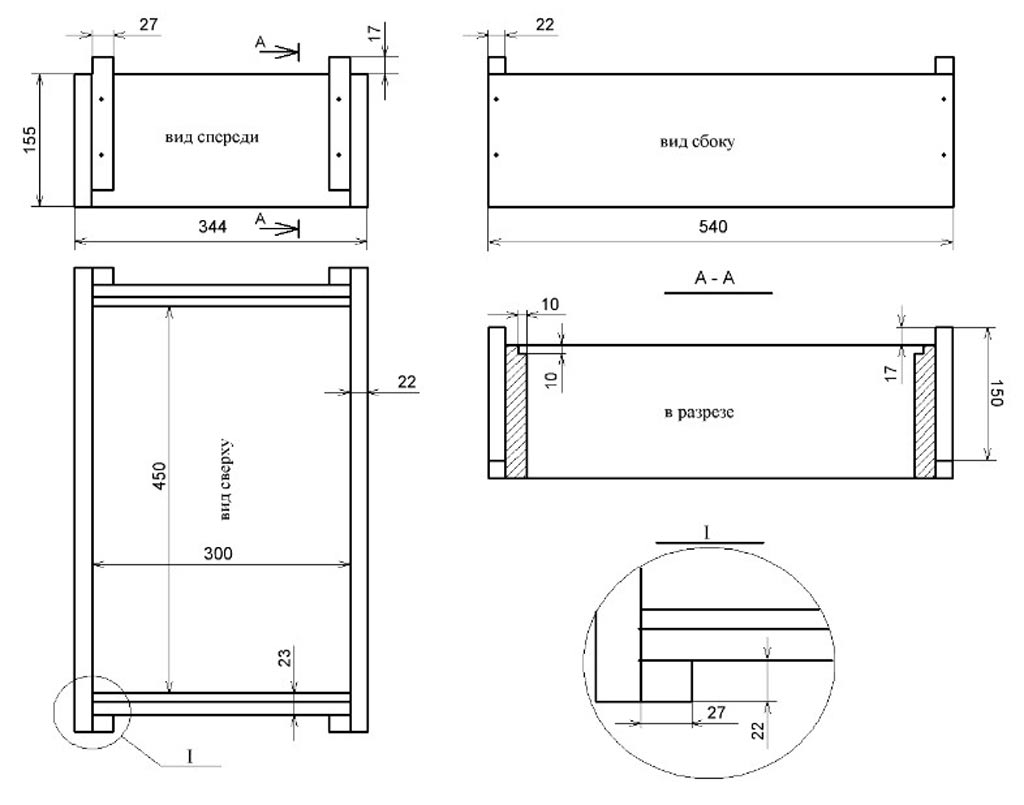
Here’s another interesting build for 10 cell frames instead of the recommended eight. In it, the dimensions of the horned hive are as follows (in mm):
- extension bodies – 153 in height;
- sidewalls 535 in width – the standard width of the honeycomb frame plus the distance to the walls of 16 mm (2 times 8 mm), plus the thickness of the walls, plus the outer protrusions of 40 mm (2 times 20 mm);
- the front and rear wall is 389 in width – taking into account the ten installed honeycomb frames (37 times 10), plus the extreme spikes (7 times 2), plus a gap of 5 mm;
- folds along the front and rear walls at the top – 8 by 11 (for installing honeycomb frames with an 8 mm thick top bar);
- spikes on the front and rear walls – 7 to 10 (for fastening in the grooves of the body sidewalls);
- sidewall grooves for housing assembly – width 7, depth 10, indent from the edge of the board 20 (you can cut the grooves in two passes – 3,5 and 7 to relieve the load from the router).
When assembling into a thorn, the most important thing is to provide a flat surface of the desktop so that there is no “propeller”. The spikes sit in the grooves with a mallet, the joints are aligned and additionally fixed with 45 mm self-tapping screws.
In the finished form, a gap of 8 mm should remain between the honeycomb frames and the walls, as well as the bottom. In this case, the upper bar of the frame lies flush with the upper cuts of the walls.
“Horns” are made from bars. In the above example of the assembly, their cross section is slightly different than in the drawings of Palivoda: 25 by 18 instead of 22 by 27 mm. This is permissible if the height of the parts is taken into account – they should protrude at the top and not reach the bottom cut of the walls of the body.
The length of the “horns” in this example is 150 mm – they protrude 15 mm at the top, and below the height of the body by 3 mm.
Letkovye holes are drilled only in one, the lower case! It stands at the bottom in summer and second during wintering. For this task, a 25 mm diameter pen drill is used.
Video instruction on the manufacture of cases from the author of the idea:
Note: Experienced beekeepers do not advise making additional upper entrances in the hulls, since when the hull is removed during the honey collection period (for pumping out), the bees are looking for an entrance to the house for a long time and at the same time angrily attack people near the apiary, including neighbors!
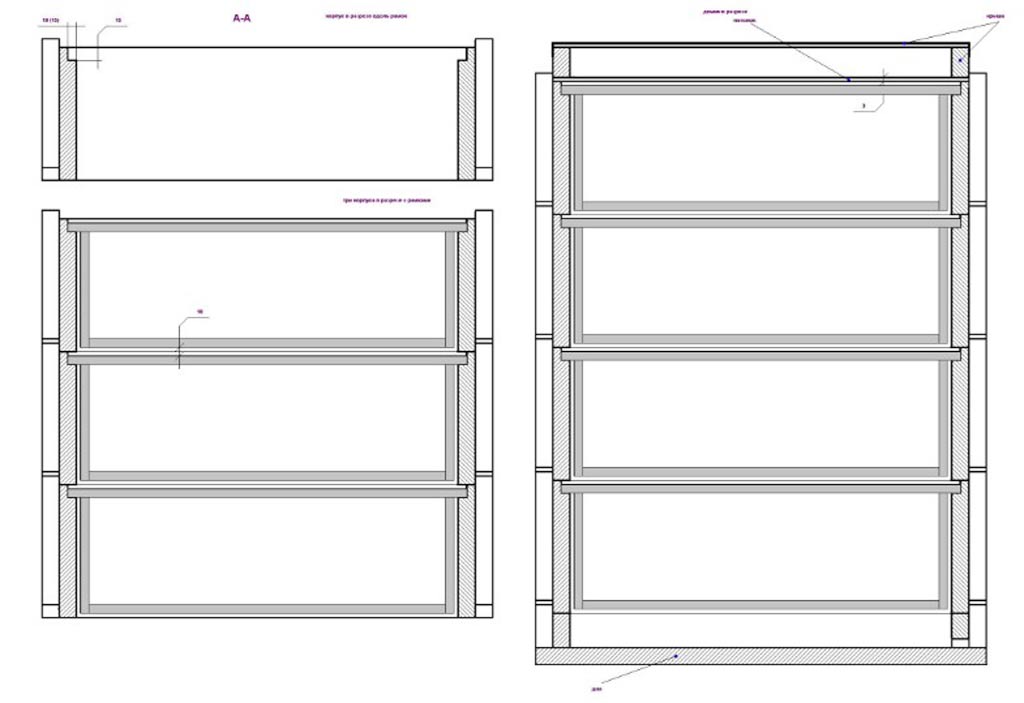
Horned beehive blueprints (another build option):
Another set of blueprints for a hive formed from some store extensions:
In conclusion
The design proposed by Mikhail Palivoda is easy to assemble and operate. Ideal for nomadic beekeeping farms. If desired, the enclosures can be assembled taking into account the size of the frames already used in the apiary.
For successful outdoor wintering, it is necessary to lay a piece of foam plastic sealed in polyethylene at the bottom and reliably insulate the ceiling.
You can read more about beekeeping in hives of this design here: How to keep bees in horned hives


 honey")


")


